The first time I tried to take a photo of the stars I pointed by DSLR at the night sky, snapped a shot with the settings I’d been using in the day, and then got…nothing!
It turns out there is more to it than just shooting upwards, but since then I have learned a lot about how to take pictures of stars and I can tell you that it can be done quite easily as long as you do the right research and planning first.
In this article, I explain the five areas you need to consider, covering:
- What equipment to use
- Planning timing and location
- What settings to use
- How to take the photo
- Post-processing
Follow this and you’ll be producing amazing photos to impress before you know it. Let’s get into it.
Taking Photos of Stars: Equipment
To take a photo of the stars you will need a:
These don’t have to be top-of-the-line brand-new equipment, but having the right gear as laid out below will make it much easier to take great star photos.
Cameras

For a camera, you want a DSLR or similar mirrorless model that allows you to change the lens you attach to it.
For best results, this will be a model with a full-frame sensor, rather than an APS-C sensor.
This is because:
- With interchangeable lens DSLR/mirrorless cameras, you can attach the most suitable lens for star photography to it (as opposed to point-and-shoot cameras or bridge cameras, where the lens is built in and fixed)
- These cameras can be used in manual mode, which gives you the control you need over the settings
- Full-frame sensor cameras are better in low-light conditions and capture a wider expanse of the sky when you are shooting (as opposed to APS-C sensor cameras, which crop what is captured to make it smaller)
You can read a further explanation of this in our article on the Best Cameras for Astrophotography.
However, if you already own a DSLR – even an entry-level model with a crop sensor – there is nothing to stop you from using that.
You can definitely take great photos of stars with these cameras – it’ll just be a little harder.
That’s what the best cameras do with star photography – make it easier, not make the impossible possible.
Lenses
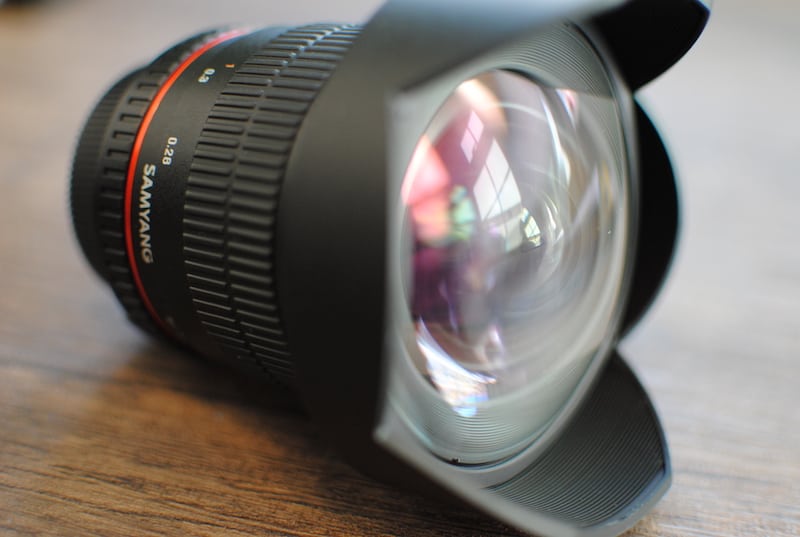
To attach to the camera, you will need to use a lens with:
- A wide-angle focal length
- A fast aperture
A wide angle is indicated by a low focal length in millimeters, for example, 14mm.
Anything from 8mm to 35mm could be considered “wide” and work for star photography. Some even have great results with 50mm lenses.
This might seem counterintuitive since you are photographing objects that are very far away and think a long focal length will allow you to zoom in more, but a short focal length allows you to capture a wider expanse of the night sky whereas a long focal length results in a narrow field of view.
This is the second characteristic of a good lens for star photography – a fast aperture indicated by a low f-number.
The “faster” the lens, the better it will be at capturing light from dark skies. So f/2.8 aperture is great, but f/1.8 is better.
The lens that comes packaged with most entry-level DSLRs is 18-55mm, which is plenty wide enough and can be used for night sky photography, but it will not usually have a fast enough aperture and might hold you back. Again though, it’s not impossible, just harder.
Read our article on the Best Lenses for Astrophotography to understand more on this topic.
Tripods
The third key pillar is a good sturdy tripod that will stay completely still whilst shooting.
This is because you are going to be taking long exposures and your images will be ruined if the tripod shakes at all in the wind or from the vibrations of footsteps.
You can see here the Best Tripods for Astrophotography but you don’t necessarily need the best of the best, just not the worst.
A flimsy, budget tripod will hold you back, but you can easily pick up models that are good enough for $50-60.
Other Gear for Taking Pictures of Stars
Whilst these three things above are essential, there are other pieces of equipment and accessories that you might want to add:
- A Star Tracker – These are small mounts that sit between your tripod and camera and move your camera at the speed and direction of the rotation of the Earth so it stays focused on the stars. This is something you might want to invest in as you progress but is not essential. See the Best Star Trackers for more on this.
- An Intervalometer – These are remote controls for your camera that allow you to program it to shoot a certain number of times with your chosen settings. See the Best Intervalometers.
- A red headlamp – Since you are going to be going out in the dark you will need something to help you see. However, regular white or yellow light from torches ruins your night vision so you are best with red light, which does not. Having it as a headlamp also means you have your hands free.
- A spare battery for your camera – You don’t want to run out of juice when you’ve got up in the middle of the night to shoot the stars.
- Camera memory card – Again, check you’ve got the essentials packed so you don’t waste your planning.
- Light pollution filter – A bit more advanced, but these can be used to improve images taken from light-polluted locations. This is not essential and you can one to add to your setup later if you’re keen on taking this further.
Obviously, depending on when and where you are shooting you will need to consider clothing, food and drink, phone and charger, and other supplies to bring.
Planning Timing and Location for Taking Photos of Stars
The most important element of being able to successfully take photos of stars is planning.
It’s not as fun as getting a new bit of gear, but the greatest camera in the world will lose to a lesser one if the conditions aren’t right.
You need to consider:
- Weather
- Moon phase
- Light pollution
- Composition and location
- Timing
Let’s look at each of these in turn.
The Weather
To take photos of stars you want clear skies free from clouds and there are some great apps to help you plan this.
See the Best Apps for Astrophotography for a full list, but a great one free I use is Clear Outside.
Using the app here I can see that in Boulder, Colorado on this night it’ll be fairly cloudy in the evening but early in the morning the skies should be clear:
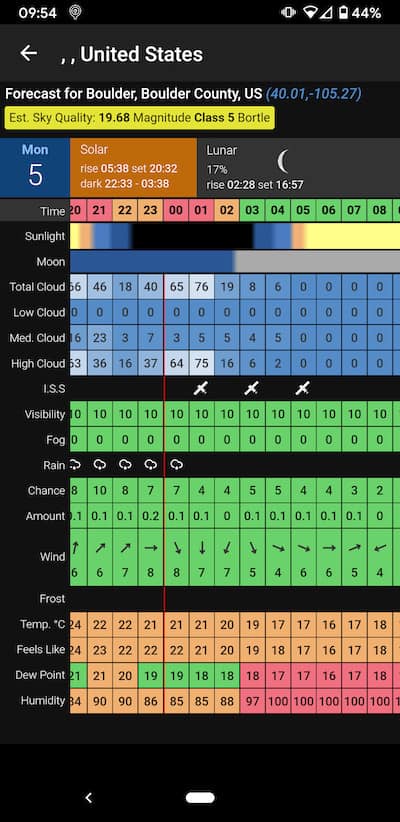
It also gives you other great information about the phase of the moon, the time of sunrise and sundown, the temperature, and the chance of rain.
Moon Phase
You want the moon to be as small as possible, ideally a New Moon, when it is completely invisible in the sky.
This is because the moon is a source of light and to get the best shots of stars you want the sky to be as dark as possible.
Therefore, you want to try to aim for as close to a new moon as possible.
You can use websites or Clear Outside to get this information.
The screenshot above tells us that the moon will be at 17% on that day, but if we look forward we can see that this will get smaller each day until the 9th of the month when there will be a new moon (0%) and the darkest skies:
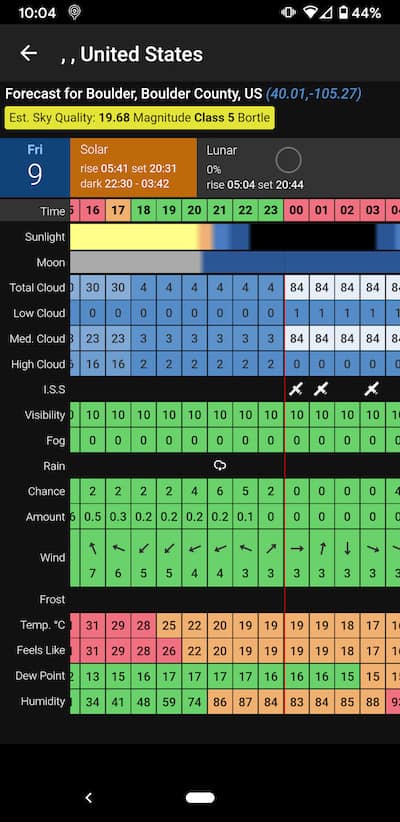
In fact, on this day the conditions look perfect for shooting the night sky!
Light Pollution
You are much more likely to get great pictures of stars if you are shooting from a location with low light pollution.
For the most part, this means away from city centers with many street lights and buildings.
We want to avoid this because – like with the presence of the moon – we need dark skies to allow the stars to shine through more easily.
You can check a light pollution map to check how it looks where you are or to scope out other possible sites.
You can read more about this in our guide to Light Pollution and Astrophotography.
Composition & Location
As well as finding somewhere with as little light pollution as possible, we also want somewhere where we can take a great shot that incorporates some of the features of the landscape.
The PhotoPils app is a great tool for this and allows you to scope out locations in the daytime and use augmented reality (AR) to see how they will look at night:
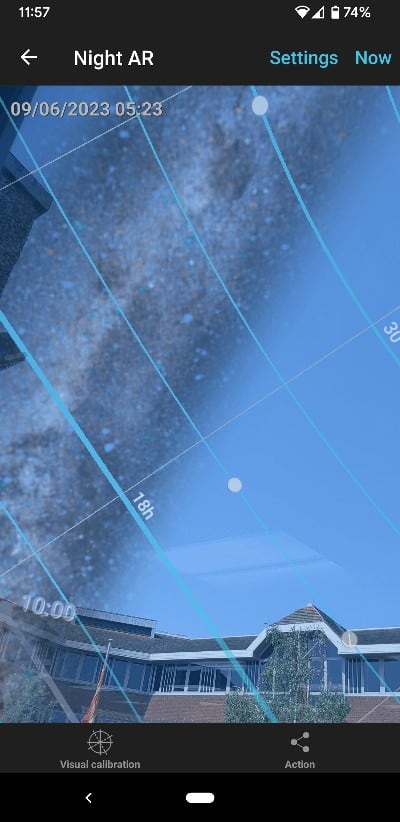
Also, Stellarium can be used for this for free. Either as an app or website.
Using it here we can see that on this night in Boulder, Colorado at around 1am the Milky Way will be visible when facing south:
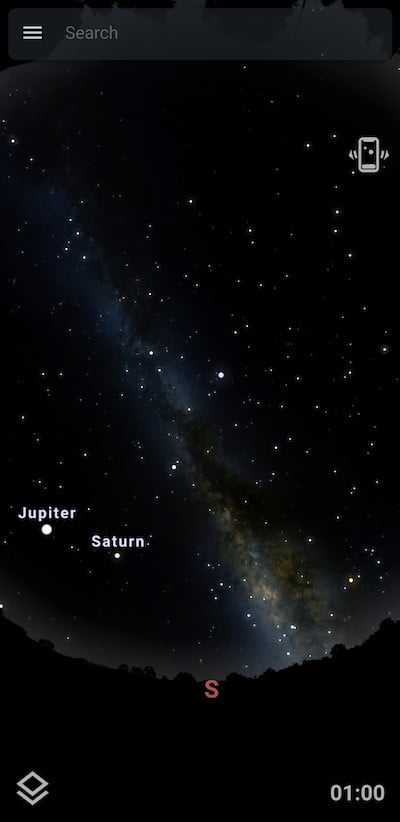
This is an important element of planning our composition – does your shooting spot enable you to face south to capture this?
In addition, this tool tells us that we may be able to capture both Saturn and Jupiter within the shot (they will appear as bright stars, but it’ll be cool to know that they are part of your image).
If you want to capture the Milky Way then you can see our guide to Photographing the Milky Way, it requires an extra level of planning and it is only able to be photographed for a few months of the year.
Star Photography Settings
Now that we’ve got our gear together and planned our timing and location, it’s time to take our picture.
This is where we get our settings right as none of the preset modes like automatic are going to work for us.
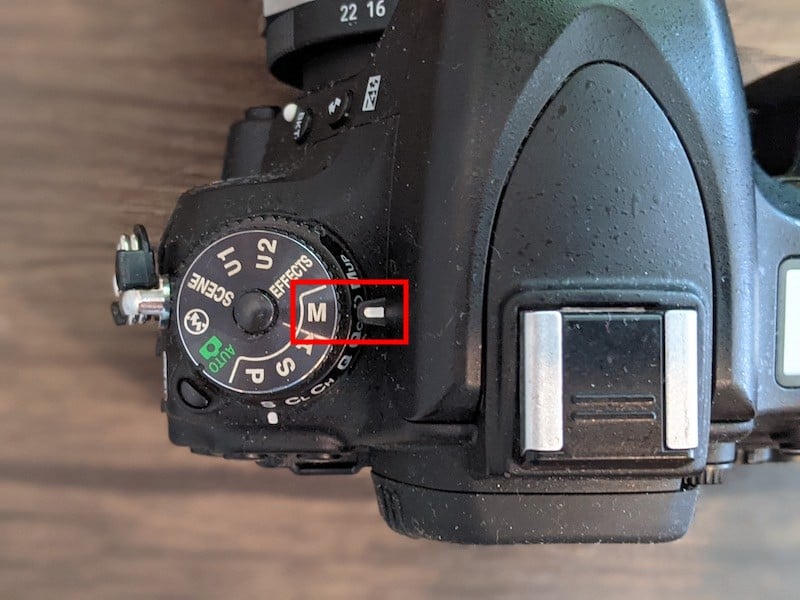
Manual Mode
The first thing you are going to want to do is to have your camera in Manual (or Bulb) mode.
The images below are for a Nikon DSLR (the D750) but will be similar for most DSLR or mirrorless cameras:
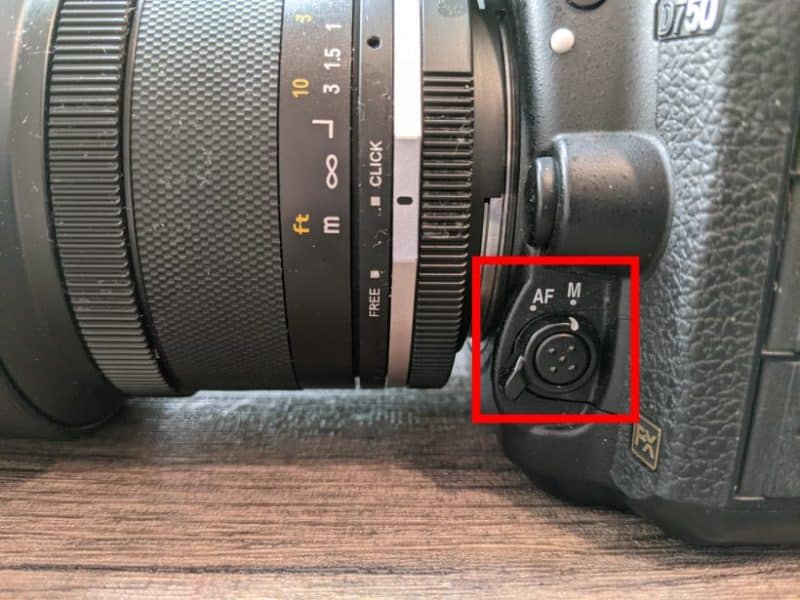
And also, have it set to manual focus for the lens:
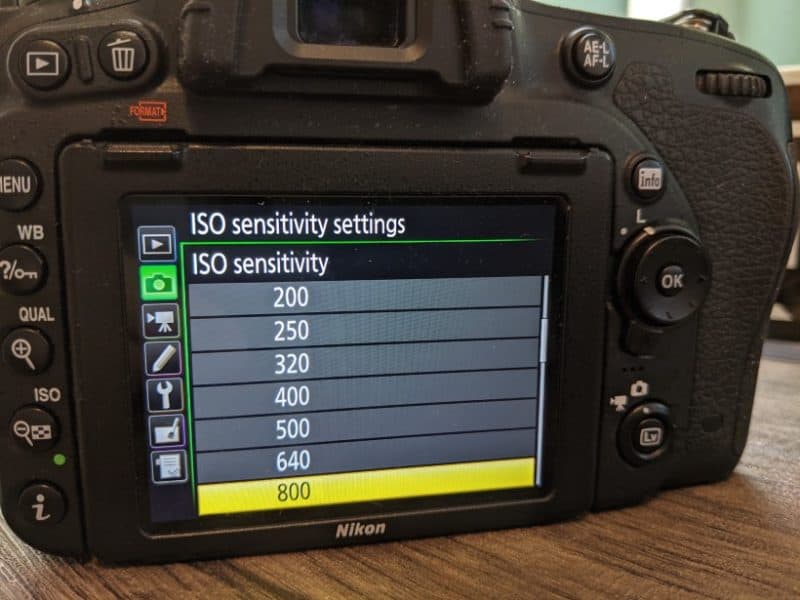
ISO
ISO governs your camera’s sensitivity to light. Generally, we use low ISO in the daytime and with good light sources, and high ISO in low light.
However, higher ISO settings degrade the quality of the image and lead to what is known as ‘noise’ in the picture (a sort of graininess that you can see when looking closely).
Essentially, you need to find the balance with your camera between having high enough ISO to capture the stars, but low enough that we retain quality in the image.
This will vary between cameras with some retaining great image quality at high ISOs but others less so.
It therefore requires a bit of experimentation with your own setup and the best way to do this is to take an image and see how it looks before adjusting.
Try it at low (200), mid (800), and high (1600+).
One thing to note is that the image at low ISO might not look as good on your camera screen but might look better when you get it back on your computer and apply some editing or if you are planning to stack multiple images (more on this below).
Another thing that is worth doing when trying to capture the stars is to take an initial shot at a high ISO so you can see how it looks from a composition point of view in the camera. You can then shift the composition if needed and lower the ISO to take a better-quality image.
Exposure Time / Shutter Speed
Working out your exposure time is a key element. You want to keep the shutter open for as long as possible to capture as much light and give you the best chance of photographing the stars, but, as noted earlier, this is limited by the stars moving in the sky as we shoot (or, more accurately, the Earth we are standing on rotating).
There are a couple of rules that give us guidance on calculating this:
- The 500 rule
- The NPF rule
500 Rule
The 500 Rule is: 500 divided by the focal length of your lens equals your exposure time in seconds.
So, with a 14mm lens that would be 500/14=35.7, or 36 seconds.
We have a free 500 Rule Calculator that you can use to work this out.
However, this tends to overestimate the time and most prefer to use the NPF Rule.
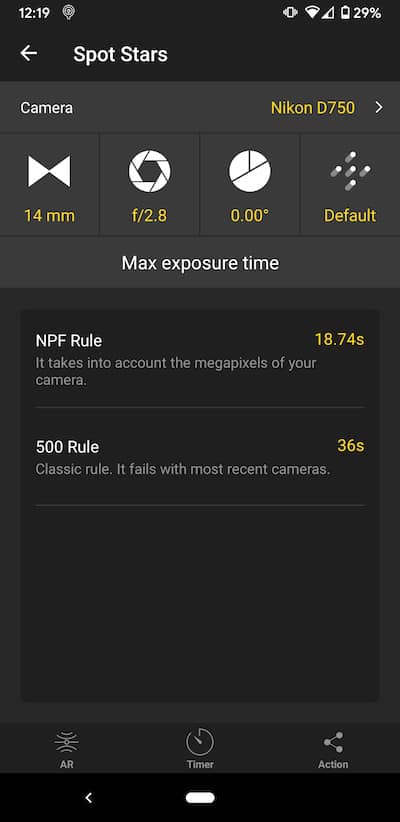
NPF Rule
This is a more complicated equation that takes into account the megapixels of individual cameras – we have a free NPF Rule Calculator that you can use online.
The app Photopils can also work it out for you too when you enter your camera and lens information.
Here you can see for a Nikon D750 and 14mm lens, the NPF rule says we should have our exposure time of 18 seconds (rather than the 36 seconds suggested by the 500 rule):
Aperture / Fstop
You want your aperture to be as wide (fast) as possible as this gives it the best capacity to capture the low light.
So with an f/2.8 lens, this should be f/2.8.
The only caveat with this rule is that some lenses tend to perform better when they slightly below the widest setting and so you might find you get better results when choosing one step narrower.
But to start with, just keep it simple and make it as wide as it goes.
Image Format – JPEG & RAW
Within your camera’s menu you can choose whether your camera saves the photos in JPEG or RAW format. The key things to know are:
- JPEG means that your camera has done some processing itself within the camera and so you are likely to get a better-looking image at first glance.
- RAW means it is the unprocessed data in an image, so it may not look as good on the camera screen but it retains the potential for you to edit it and make it look better.
Therefore shooting with RAW is recommended, since with night sky photography we can usually substantially improve the images with post-processing (see below).
This might seem daunting at first, but is generally a matter of playing around with your chosen software and seeing what makes it look better and learning as you go along.
One thing you can do is choose to have your camera save in both JPEG and RAW.
That way you can see if the JPEG version processed in the camera looks good enough for you – for example, it might be good enough to share on somewhere like Instagram where it is generally going to be very small as the flaws might only show up if blown up really big.
You can then delete the RAW files if needed, or play around with them in post-processing.
The only other small factor to consider is that RAW files are usually very big since they retain so much data and so will fill up your memory card quickly if you have too many.
White balance
Use Daylight or Auto for your White Balance setting.
This can also be tweaked in post-processing if shooting with RAW.
How to Take a Photo of the Stars
Now that we have our settings right, it’s time to set up our image.
How to Focus
Getting the focus right is essential to capturing our image with pinpoint stars. You cannot fix unfocussed night sky images in post-processing in the way you can other factors.
The best way to do this is if your camera has a live view screen. What you do is:
- Get your gear set up with tripod etc and the settings as laid out above.
- Put your lens to infinity.
- Zoom into a bright star on the live screen and tweak the focusing until the star is as small and sharp as it can be.
This should then be focused perfectly. Just make sure that you don’t move the focus on the lens even a tiny bit now, some lock it in with tape.
If you don’t have a live view screen on your camera there are a few other ways of focussing including using a far-off object in the daytime to focus on and then locking it in until dark.
Here is a good video from Ayln Wallace to give an overview of the options:

How to Shoot
Now we are focussed and the stars are pinpoint sharp and have got to our location and composed our image we are ready to shoot.
As noted earlier, we don’t want to press the shutter release button with our hand as this will result in the camera moving slightly and ruining our image.
One easy way to avoid this is to use a shutter release delay so that once you press the button it counts down from 3 or 10 seconds before shooting.
This can usually be done with your camera’s internal settings but also with an external intervalometer.
The other option is to program your camera to take multiple shots of the same composition with the intention of stacking them later. Again, this can often be done within the camera:
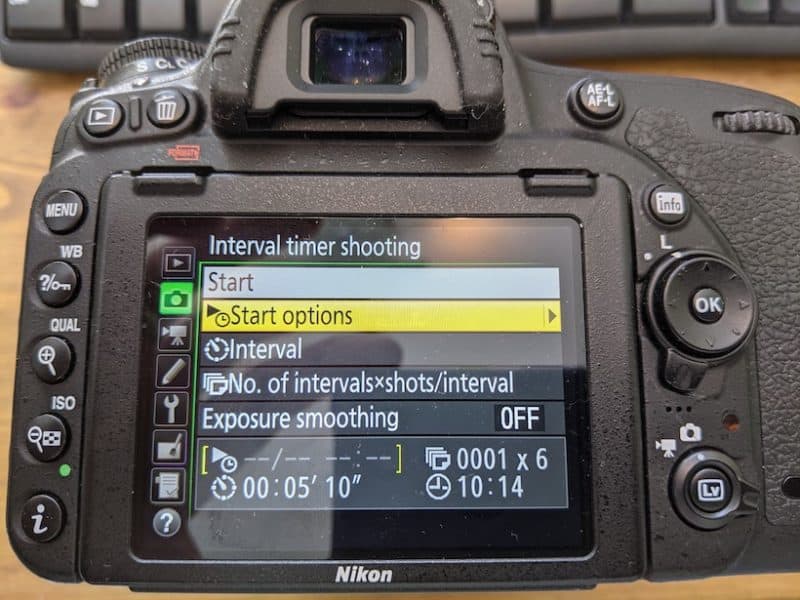
What you want to do is program it to take multiple shots using your settings calculated earlier (ideally with the NPF Rule).
You can specify the number of shots and the interval between each shot. The interval is important as it takes your camera a few seconds after a shot to deal with the internal processing.
Therefore a good example program would be 8 shots of 20 seconds each with a 10-second delay between each shot.
You then set it to start shooting on a delay from your pressing the shutter release button.
If this has all gone well then you will end up with a set of images that might not look like much on your camera screen but they enable us to stack them and produce something really great later.

Star Photography Post-Processing
Now that we have our set of images, we can take them home and see if we can make them even better with editing.
Processing
Basic processing can be done in software like Adobe Lightroom or Affinity Photo, or even free online tools like Pixlr.
We won’t cover this in too much detail here, but you can play around with the settings and see what works for you.
Stacking
Aside from basic editing, we can use our group of images and stack them. This means using software to place them on top of each other to bring out the stars. Doing this enables us to keep our ISO low when shooting and so we shouldn’t have too much noise in our images.
This can be done in paid-for software like Photoshop or Affinity Photo, but there are also free tools like Sequator.
It’s best to follow an online guide when doing this the first time, but essentially you upload all the images and it stacks them for you into one.
You can then take this image to your chosen post-processing software like Lightroom and apply any tweaking necessary to make the photo even better.
Final Word: Taking Photos of Stars
Whilst it’s not a simple process if you follow the steps in this guide and do a little bit of planning you should be well on your way to producing stunning starry sky images.
Following these steps, here is a photo of the stars that I took from my backyard:
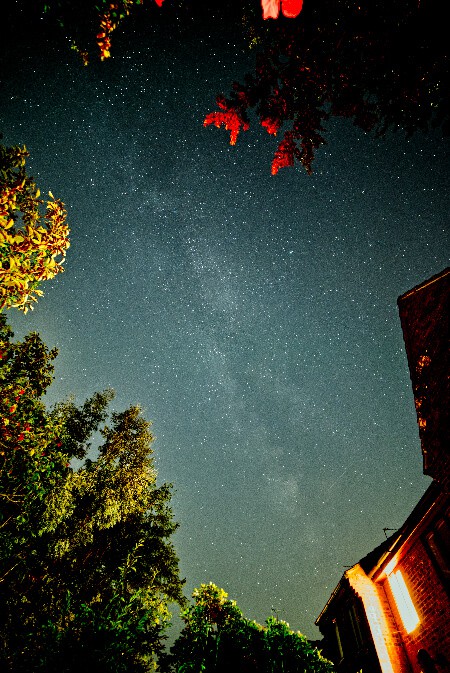
Whilst we have talked about the best gear to use, you can easily get started using an old camera or even just a smartphone.
Doing this will enable you to learn the planning elements before you make any investments in full-frame cameras and fast-aperture lenses.
If you have any comments or questions, please leave them below.
