The NPF Rule can be used to work out the ideal exposure time for photographing the stars and Milky Way in the night sky based on the camera and lens you are using.
Use our free NPF Rule Calculator here:
NPF Rule Calculator
How to use the NPF Rule Calculator
You need to enter three pieces of information to calculate your exposure time:
1. Aperture
Enter the aperture of the lens you are using.
For example, if you are using an f/1.4 lens at its widest then enter “1.4”.
2. Focal Length
Enter the focal length of the lens you are using.
For example, if you are using a 24mm lens, enter “24”.
3. Pixel Pitch
Enter the pixel pitch of your camera model. This is a figure based on your specific camera’s sensor resolution and width.
Don’t worry, if you don’t know this (not many people do) as it is easy to find out.
A quick way is to simply Google it – for example, “Sony A7 III pixel pitch”. Or you can search in the Digital Camera Database.
For example, from a quick search, I can see that the Nikon Z7 II pixel pitch is 4.34 µm. Therefore I would enter “4.34” in this field.
4. Calculate your exposure time
Once these pieces of information are added you can press “Calculate” and it will give you your recommended exposure time in seconds.
This can then be used as a guideline for your shutter speed settings.
For example, with a Nikon Z7 II and 24mm lens at f/1,4 it would be 7.5 seconds.
What is the NPF Rule?
The NPF Rule is the most accurate guide to calculating the exposure time (shutter speed) that you should use to capture astrophotography images of sharp stars.
This is necessary because:
- To photograph the night sky you need to take a long exposure to capture enough light, but
- If this exposure time is too long the stars will not be sharp in your image because the Earth is rotating and so the stars “move”.
Therefore you need to estimate the maximum exposure time you can use to capture the most light, but before any blurring or trailing of the stars occurs.
There are other calculations for this but the most accurate is the NPF rule, as it takes account of the capacity of the camera you are using.
Who is the NPF Rule for?
The NPF rule is for landscape astrophotography using a regular DSLR or mirrorless camera and a regular camera lens.
This is as opposed to deep sky astrophotography using dedicated astronomy cameras and astrophotography telescopes.
Therefore, if you are planning to shoot the night sky or Milky Way with your Sony, Canon, Nikon, Pentax, or Fujifilm camera, then the NPF rule is probably right for you.
What is the NPF Rule Formula?
“NPF” stands for:
- N = Aperture (the official notification for aperture in optics is an “N”, not an “A”)
- P = Pixel Pitch
- F = Focal Length
The NPF Rule formula is:
((35 x N) + (30 x P))/F = Exposure Time (in seconds)
Where does the NPF rule come from?
The NPF rule was created by Frédéric Michaud from the Astronomical Society of Le Havre in France (Société Astronòmique du Havre).
A detailed explanation of the NPF can be read here (it’s in French, but Google can translate).
NPF Rule FAQs
Are there different versions of the NPF Rule?
The calculator above is the simplified version of the NPF Rule.
There is a more advanced “complete” version that requires more information to be added. This is:
- Aperture
- Pixel Pitch
- Focal Length
- Crop Factor (whether the camera’s sensor is full-frame or cropped like APS-C)
- Declination (a measure of the distance of the stars you are shooting from the celestial equator)
- Accuracy (a scale of 1-3 that defines how sharp you need it)
You can use an online calculator for this here at the Société Astronòmique du Havre, or you can use an app like PhotoPills:

What is Pixel Pitch?
Pixel pitch is the distance from the center of one pixel to the center of the next pixel. It is measured in micrometers (µm).
The formula for pixel pitch is:
(sensor width in mm / sensor resolution width in pixels) × 1000 = pixel pitch
Rather than doing the formula yourself, it is easy to just search online for the information specific to your camera.
What is Pixel Density?
Pixel density is a measurement of the resolution of a camera’s sensor (i.e. the number of megapixels) to the size of the sensor. It is given in MP/cm².
The formula for pixel density is:
(sensor resolution width in pixels / sensor width in cm)² / 1000000 = pixel density
Some guides to the NPF Rule talk about entering the pixel density, but it should be the pixel pitch.
NPF Rule vs 500 Rule
The 500 rule in astrophotography is a much simpler way of calculating a recommended exposure time for capturing the stars.
The 500 rule formula is:
500 / lens focal length = exposure time (seconds)
You can also use our free 500 Rule Calculator.
The 500 rule is less accurate than the NPF Rule as it doesn’t take into account the higher resolution of modern cameras.
It, therefore, overestimates how long you can shoot before you get distortion in your images of stars.
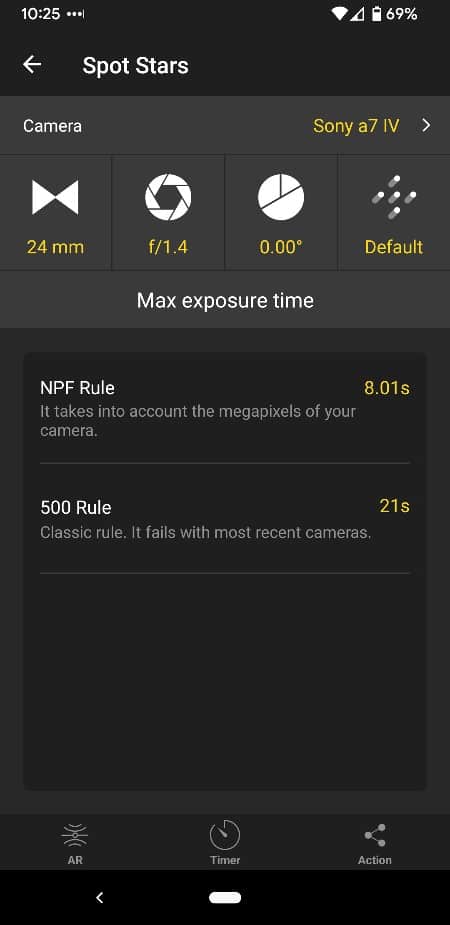
For example, using a Sony A7 IV camera with a 24mm f/1.4 lens you would get:
- 8 seconds using the NPF rule
- 21 seconds using the 500 rule
The 500 rule is here a large overestimate.
The positive about the 500 rule it is that it is very easy to work out and these are all just guidelines to help you experiment and find what works for you.
What is the MFN rule for astrophotography?
Some online translators translate the original French from Frédéric Michaud to “MFN”, rather than “NPF”.
It is all just the same rule though, so you can ignore this.
Using the NPF Rule Calculation
The NPF Rule is a great way of knowing where to start with your shutter speed settings when photographing the stars and Milky Way in the night sky.
It is more accurate than the outdated 500 Rule, but it should still just be taken as a guideline.
For the best results you will need to play around with your settings and find what works for you.
You will also be figuring out the right ISO and other settings for the best results and a lot of this can only be done with practical experimentation.
Related articles:


