For this beginners guide to landscape astrophotography, we cover all the steps to help you take amazing images of the night sky above Earth.
To support this, we analyzed 260 of the best astro landscape images shortlisted in the Astronomy Photographer of the Year competition to share what we could learn. This includes:
- What makes a great landscape astrophotography image
- What equipment to use to do this successfully
Read on to be on your way to blow away your friends and family with your amazing night sky images!
What is Landscape Astrophotography?
Landscape astrophotography is one of the three main categories of astrophotography, alongside planetary astrophotography and deep sky astrophotography.
Landscape astrophotography is the practice of photographing the night sky and the Earth’s landscape together.
It is a combination of traditional landscape photography and astrophotography.
It is sometimes also referred to as nightscape astrophotography or nightscape photography, although this can be broader and include things like photographing city skylines at night.
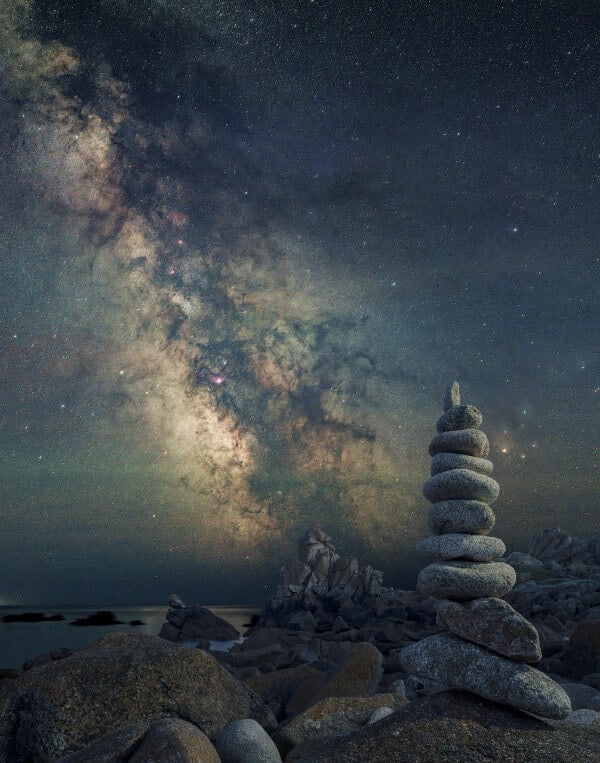
You can see a great example in this image:
Landscape astrophotography is the most accessible branch of astrophotography, because:
- It can be done with the least specialized gear. A regular camera, lens, and tripod are all you need (more on this below).
- It requires little knowledge of astronomy when compared to planetary or deep space imaging. You are photographing the stars in the night sky, rather than hunting a specific astronomical object.
- It is a relatively easy step to make for someone that is already a keen photographer using a DSLR or mirrorless camera and especially if practiced in daytime landscape photography.
The challenges with landscape astrophotography are:
- You need to go outside and get to the location you want to shoot from at night. This might mean a long drive or walk at a time when you’d prefer to be sleeping, or you may have safety concerns.
- You are at the mercy of the weather conditions – you need clear conditions to shoot the stars. You may be all set to go out one night but are scuppered by clouds.
- You have to plan your timing for what will be in the night sky. More on this below, but you need the moon phase to be right and you may also want to time the position of the Milky Way core.
Let’s now look into what makes a great astro landscape image.
What Makes a Great Astro Landscape Image?
In our study, we analyzed 685 images shortlisted in the last five years (2018-2022) for the most prestigious astrophotography competition, Astronomy Photographer of the Year.
You can see the research here that covers all landscape, deep sky, and planetary astrophotography images, but in this article we are going to pull out the results specific to landscape astrophotography to see what we can learn.
From the 685 total images, 260 were landscape astrophotography images.
These images are generally a combination of foreground and night sky brought together to create something interesting and unique.
These images (usually) follow the practices of good landscape astrophotography composition. Including:
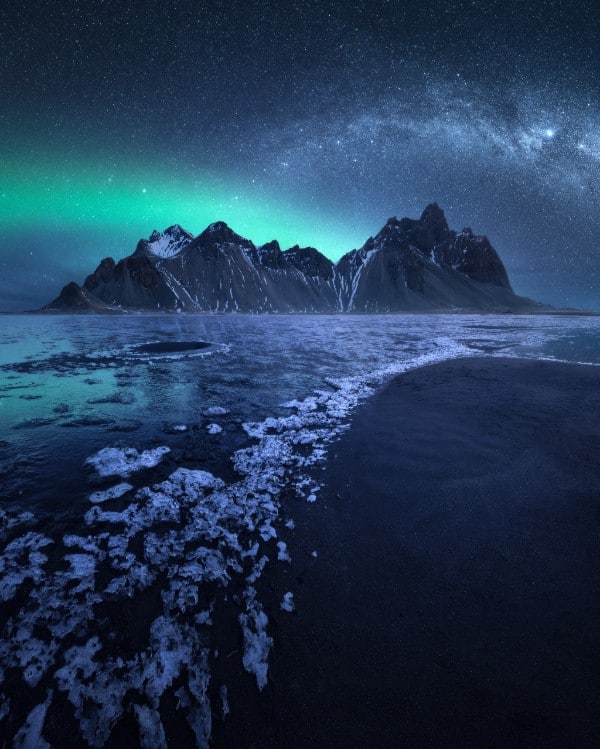
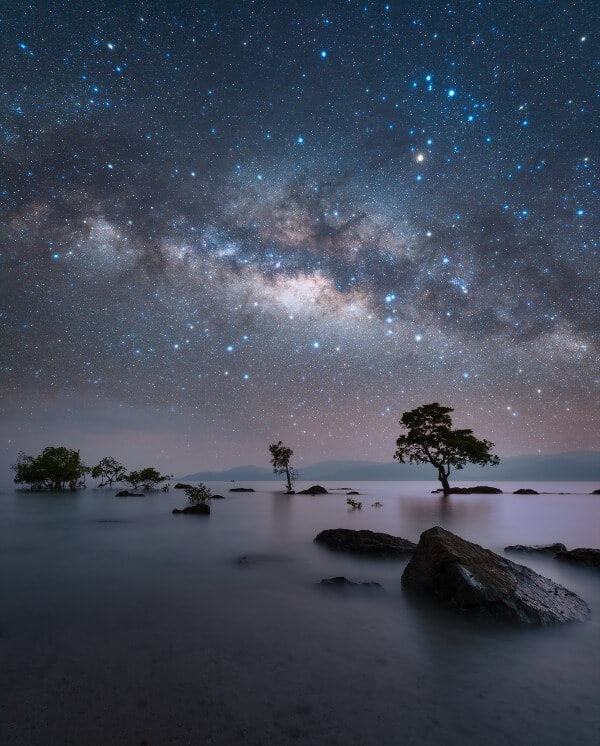
The Rule of Thirds
The rule of thirds is a guideline in photography where you break the image into thirds, or a three by three grid of nine squares.
You then position your key elements along these lines to make the image more pleasing to the eye.
With landscape astrophotography, this would most commonly be having the horizon take one-third of the composition and the night sky take two-thirds, or the other way around.
See the examples below.
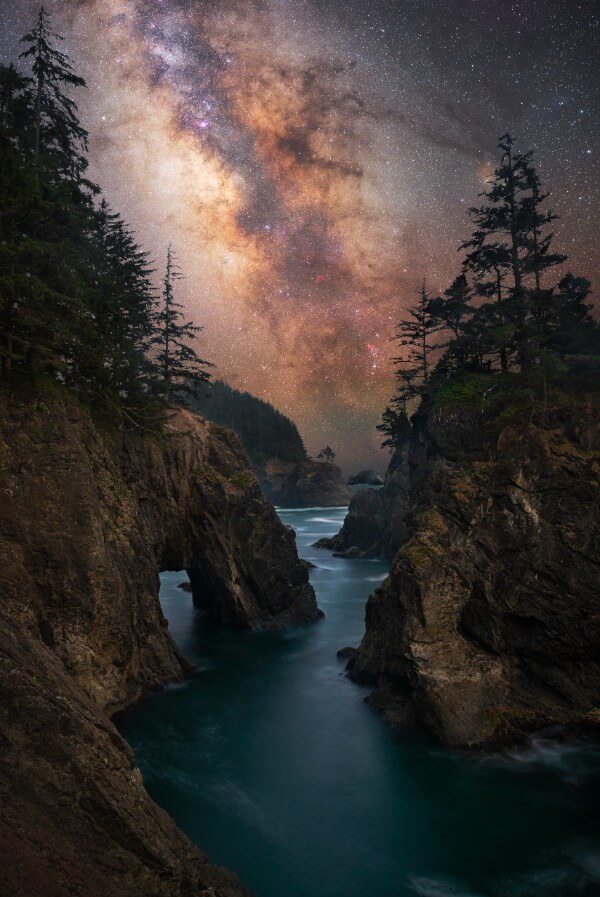
Framing
This is using part of the foreground to create a frame around the central point of interest.
With nightscape astrophotography this might be the Milky Way core as you can see in the image below:
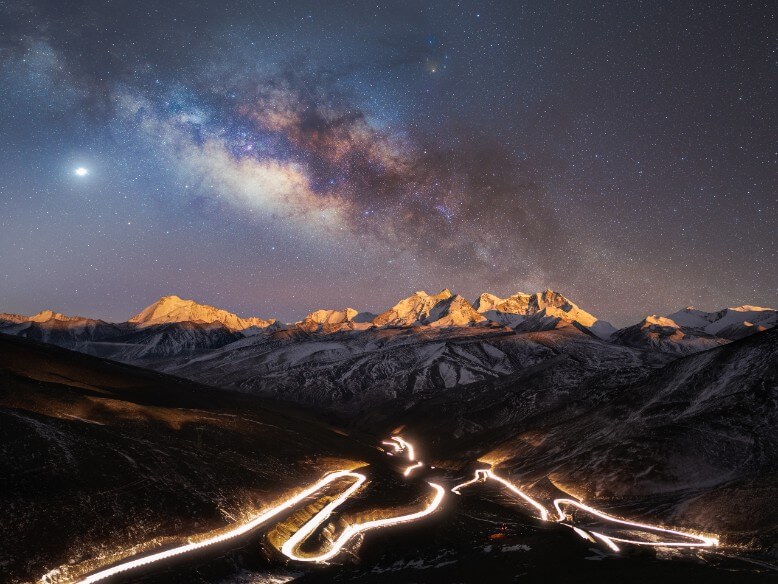
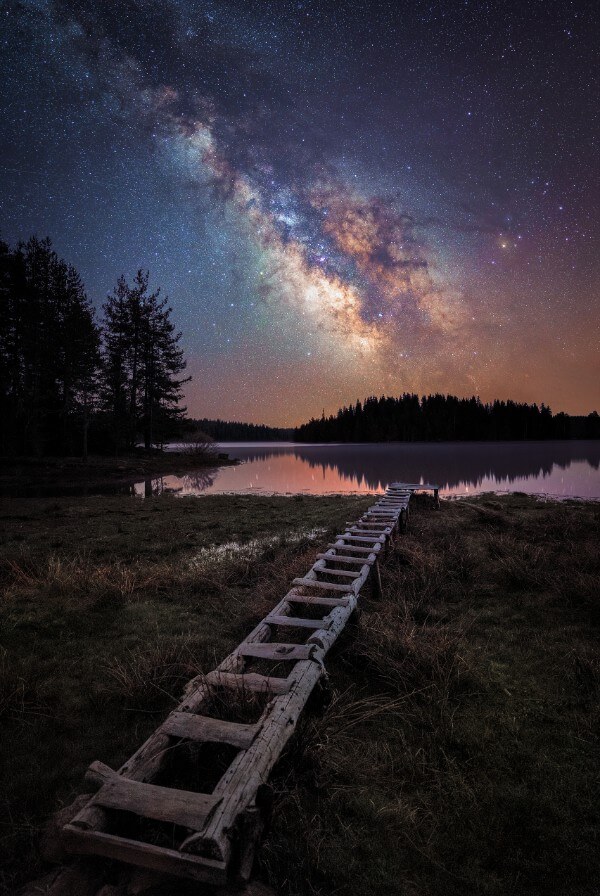
Leading lines
This is using part of the foreground to lead the viewer’s eye to the central point of interest.
Again, the Milky Way core in this image:
There are no solid rules to this but these best practices can lift a technically good image into one that makes people excited.
Viewing all the images on the Astronomy Photographer of the Year website (or buying the book) is a great place to see more examples and learn what works.
Landscape Astrophotography Equipment
For landscape astrophotography you will need at least three things pieces of equipment:
- Camera
- Lens
- Tripod
Plus there are a few optional things that you may choose to add later, like:
- Star trackers
- Light pollution filters
There will also be other things like head torches and battery packs, as well as warm clothing and coffee mugs, but you can probably rely on your common sense for knowing what you need when going out at night wherever you are.
Cameras for Landscape Astrophotography
For the best results you will use a DSLR or mirrorless camera for landscape astrophotography.
It can be done with compact cameras, bridge cameras, or even smartphone cameras, but these lack the manual functionality and interchangeable lens versatility of DSLR or mirrorless cameras.
When looking at our data, we can see that virtually all of the cameras used in the 260 shortlisted landscape astrophotography images for the Astronomy Photographer of the Year competition were DSLR or mirrorless cameras:
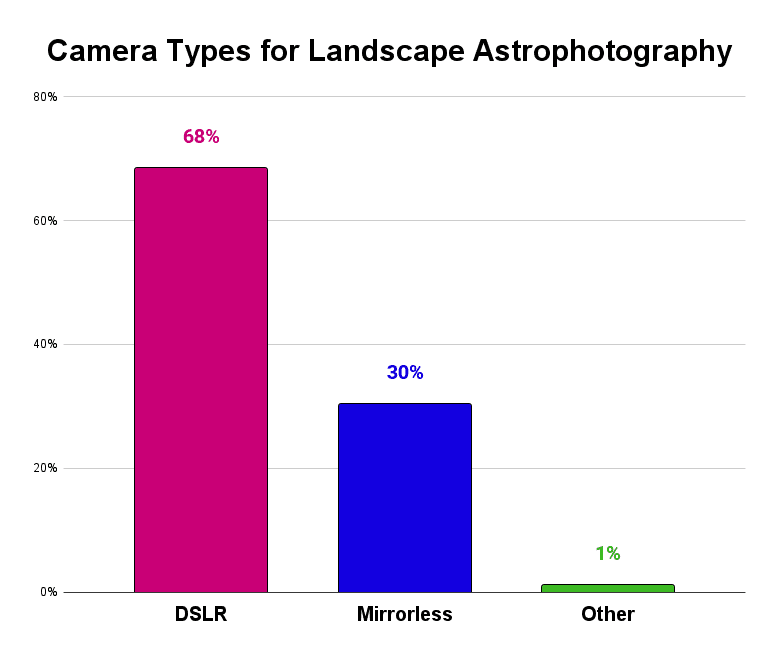
The ‘others’ are mostly smartphone cameras.
It is worth noting that whilst DSLR use is highest over the five years, this has decreased more recently as mirrorless cameras have become more common and in 2022 mirrorless cameras were more frequently used that DSLRs.
Of these DSLR and mirrorless cameras, they are virtually all models from Canon, Nikon or Sony:
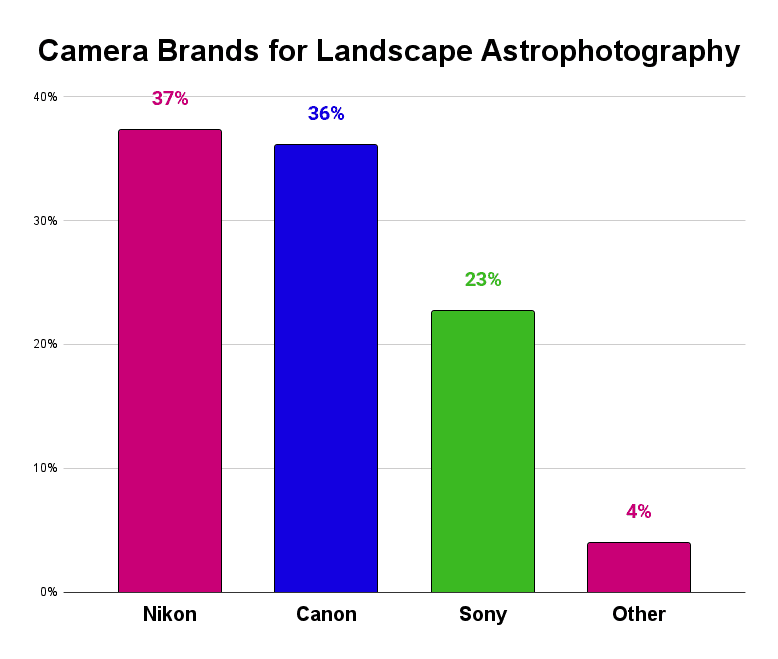
Although Canon and Nikon are out front over the five years, the proportion of images taken with Sony cameras has increased in the past couple of years and Sony overtook Canon in 2022 in the competition. This is a trend that goes alongside the shift to mirrorless cameras as Sony models dominate in this category.
The cameras used most successfully overwhelmingly have full-frame sensors:
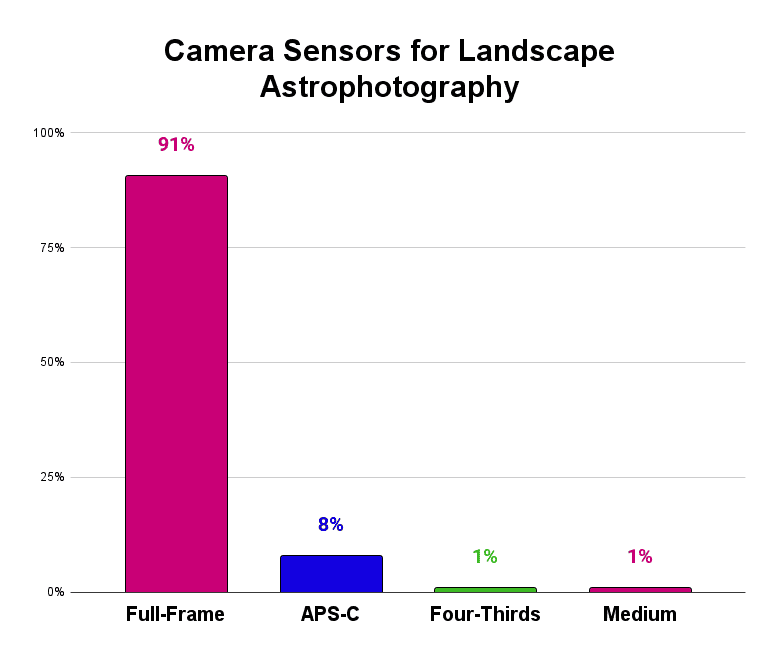
A full-frame sensor is better at performing in low light and also enables you to capture a wider expanse of the sky.
They are more expensive but this is the key characteristic you should be looking for over anything else like megapixel count.
So overall, you will be ideally wanting:
- A DSLR or mirrorless camera with interchangeable lens capacity
- With a full-frame sensor
- Probably a Canon, Nikon or Sony model
As for the specific recommended models, see the Best Cameras for Astrophotography.
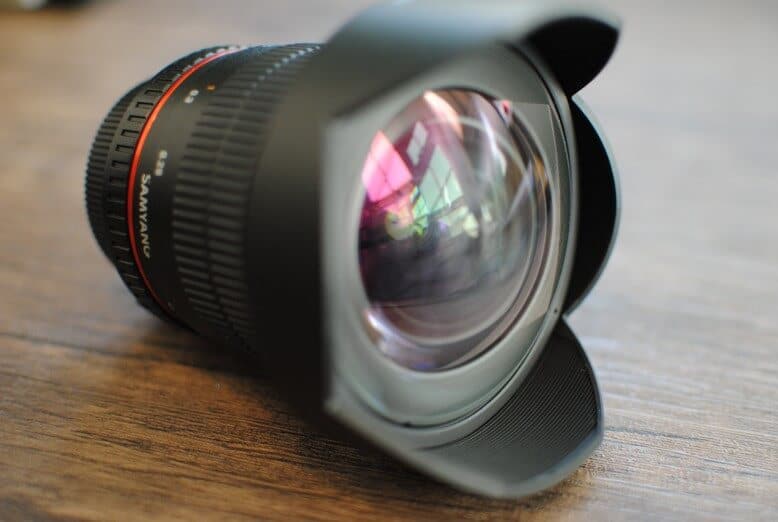
Lenses for Landscape Astrophotography
The second most important piece of gear will be your lens.
For a great landscape astrophotography lens, you are looking for two things:
- A short focal length – this allows you to shoot at a wide angle and capture a large expanse of the night sky.
- A fast aperture – this indicates how well the lens will gather light in dark conditions. This is indicated by an ‘f-number’ where the lower the number is, the faster and better the lens will be for this purpose.
Typically this will be:
- 12mm to 24mm focal length
- f/1.4 to f/2.8 aperture
Great lenses include:
- Sigma Art 14mm f/1.8
- Sony 24mm f/1.4 GM
- Rokinon/Samyang 14mm f/2.8
- Tamron 15-30mm f/2.8
See the Best Lenses for Astrophotography for more analysis and recommendations, as well as What is the Best Focal Length for Astrophotography?.
Tripods for Landscape Astrophotography
The third key pillar of your landscape astrophotography setup is the tripod.
The key thing for this is to have one that is good quality and sturdy.
This is important as you will be taking long exposure images and any shake coming through your tripod will ruin your image.
The other factors to consider are:
- Weight – especially if you are hiking out somewhere for your shot and need to carry it
- Height – how tall will it stand so that you don’t have to stoop.
See the Best Tripods for Astrophotography for recommended models.
Star trackers for Landscape Astrophotography
Once you have your camera, lens and tripod you are good to go, but there are other things you may want to add to your setup.
One of these is a star tracker.
These are motorized devices that move your camera at the speed of the earth’s rotation to match the movement of the stars in the sky.
This allows you to take much longer exposures in a single shot without any star trailing.
We would recommend starting out at first without a star tracker and just exploring the limits of your camera and lens setup.
But star trackers are great to take landscape astrophotography images to the next level and can mean you can avoid having to stack images in post-processing (more on this below).
See the Best Star Trackers for Astrophotography for the top models.
Filters for Landscape Astrophotography
Finally, you can add filters to your camera to compensate for light pollution.
This is another more advanced step to experiment with once you are experienced with your camera and lens setup and want to see how you can push it further.
Landscape Astrophotography Planning
A hugely important aspect of landscape astrophotography is planning.
You need to plan ahead the location and how you are going to get there at night, and then you need to time the night sky and weather conditions.
Let’s look now at each of these elements.
Location
There are two main aspects to consider with regard to location:
- Composition
- Light pollution
With the composition, this is where you want to shoot from and what you want to include in the photograph.
The biggest factor will be the foreground and landscape that you want in the image. For example, a mountain, lake or park that you can get to.
You need to think about how you will get there and also the direction in which you will be facing to take the shot, as this will be a factor if trying to time and capture the milky way core (if that is what you are trying to do).
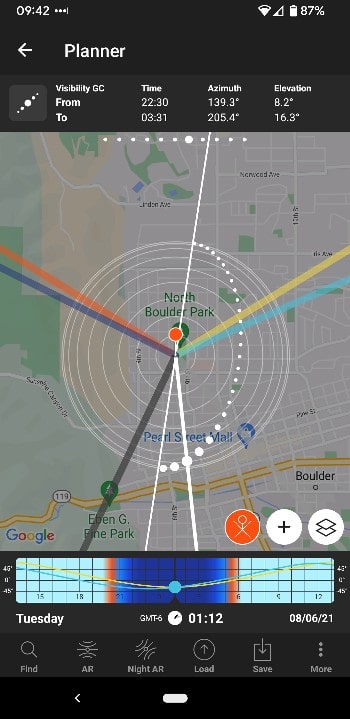
There are some great tools like Photopills or Stellarium to help plan this.
You can scout a location on your phone or computer to see things like the timing of dusk and dawn, as well as when the Milky Way core will rise and what direction it will be in.
See for example in this screenshot below, Photopills is telling us that in Boulder, Colorado on 8 June 2023 the Milky Way galactic core (GC) will be visible from 22:30 to 03:31 and will be in the Southern skies:
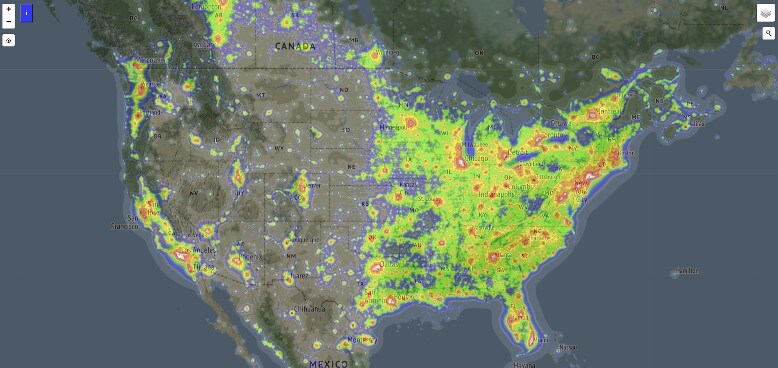
The other thing is light pollution. Most cities and towns create light pollution which brightens the night sky and makes it harder to capture the stars.
Ideally, you will take your image in an area with low light pollution and this may involve travel.
See websites like DarkSiteFinder to help research this.
Timing the night sky
Once you have your location in mind, the next thing to plan is the timing. There are two main things to consider:
- The phase of the moon
- The location of the Milky Way
The moon phase is important as a bright moon is effectively a source of light pollution that lightens the night sky and makes it harder for the stars to “pop” through.
You, therefore, need to be shooting around a ‘new moon’ which is when it is invisible in the sky.
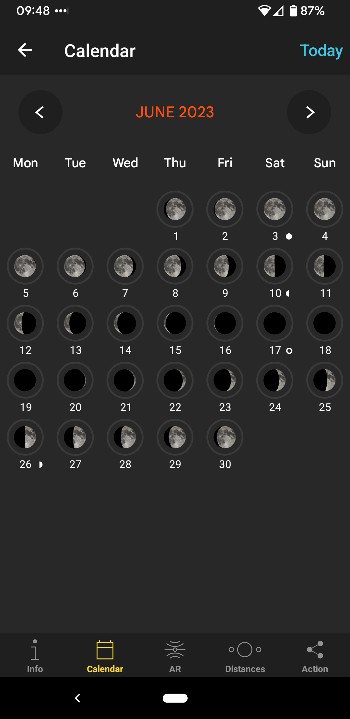
You can google for a moon phase calendar or one is included in the Photopills app:
If you want to try and capture the Milky Way you will need to research when it will be above you.
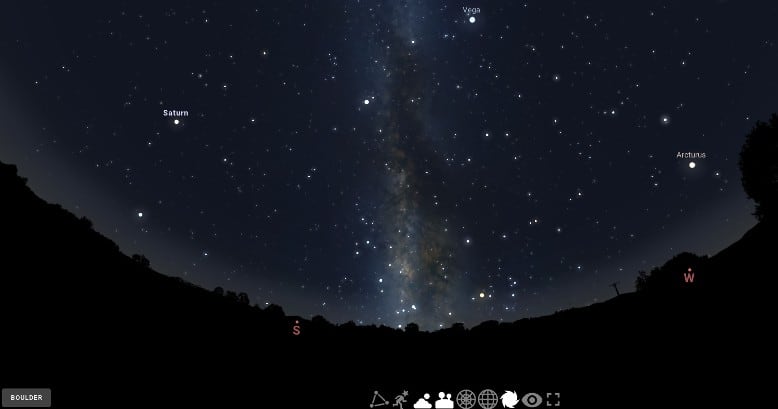
Stellarium is great for this and allows you to see the exact hour at which you can get the perfect shot:
See ‘what’s in the night sky tonight from my location?’ for more tips and tools to help with this.
Planning for the weather
The final aspect is the weather.
You can plan all the other parts to perfection but you don’t want to be gathering your gear and getting up at 2am to travel to your perfect spot only to find it ruined by clouds.
You therefore need to monitor the weather in the days in advance of your planned night of shooting to see if it will be worth it.
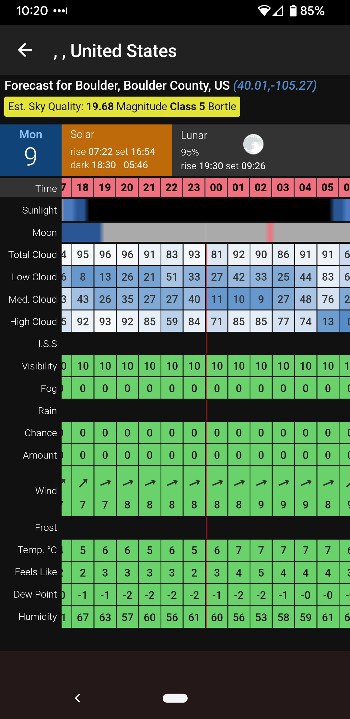
Regular weather apps and websites are good for general forecasts, but apps like Clear Outside give you a much more granular breakdown:
Depending on where you are clouds can be a real issue. I’m in the UK and getting that perfect combination of the right moon phase, milky way visibility, and good weather is a rare occurance!
Landscape Astrophotography Settings
To take your landscape astrophotography photo you will most likely be taking two photos and stitching them together afterward with post-processing software. This will be:
- One shot of the night sky – The length of this exposure will be limited by your gear.
- One shot of the foreground – You can take as long an exposure as you need to capture enough light.
An alternative tactic to get the shot in one is to light the foreground yourself with a torch or even car headlights. If using a star tracker though, you definitely need a separate foreground image or it will blur with the movement of the camera.
To capture these images then you need the right settings. The key elements to this are:
- Exposure time
- Aperture
- ISO
Exposure time
With the exposure time (or “shutter speed”) there are two handy formulas that you can use to help calculate the maximum length you can use before the stars will begin to blur.
These are the:
- 500 rule – a simple calculation of dividing 500 by the focal length of the lens you are using. So, for a 14mm lens this would be 500/14=35.7. Therefore you could, in theory, take a 35-second image with a 14mm lens and get sharp stars.
- NPF rule – this calculation is more complicated and uses the pixel density of the individual camera model, as well as the lens focal length and aperture. This is a much more accurate guideline to use.
We have free calculators that you can use to work these out:
There are calculators with apps like Photopils that allow you to input your exact camera model and lens focal length to get the most accurate recommendation.
You can see here the recommended exposure length if using a Sony A7III camera and 14mm f/1.8 lens:
- 35 seconds with the 500 rule
- 16 seconds with the NPF rule
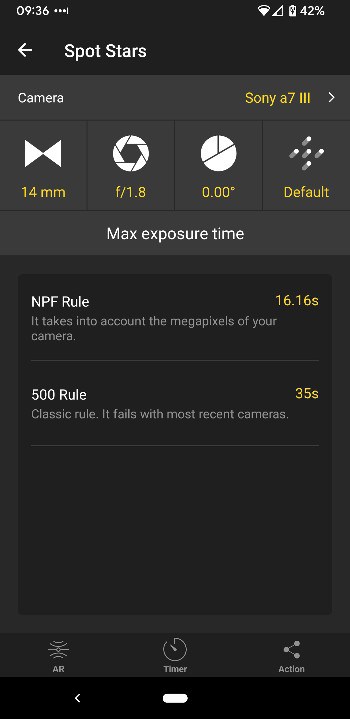
The NPF rule recommendation is shorter because it takes account of the high resolution of the camera that would show up star trailing if going over 16 seconds.
Aperture
With aperture, you generally want as fast/wide as possible.
This is because this is the widest lens setting that lets in the most light – very important for night photography.
The speed/width is indicated by the f-number on the lens. We recommend using lenses that are ideally f/1.4 of f/1.8, but there are some great budget lenses at f/2.8.
The only thing to watch out for is that some lenses perform best when not at their widest. I.e. not using f/1.8 but bringing it down to slightly narrower.
You can discover this with practice and experimentation with your chosen camera and lens setup.
ISO
ISO is a setting that is adjusted according to how much light you are photographing in, with low ISO needed in daylight, and higher ISO needed indoors or in any darker conditions.
The caveat with this is that using higher ISO levels results in noise on your images. This is a sort of graininess that you can see that detracts from the quality of the image, especially if blown up large.
You need to experiment with your camera to find the right level for you. You don’t want it ultra-high or it will be too noisy, but too low and it will impact what you will capture in the night sky.
For the best results, you will take multiple images and stack them in post-processing (more on this below). This is very effective at removing noise, but adds a layer of complexity from simple composing and shooting.
One thing a very high iso can be used for is to take initial images to help you compose your shot, as this helps show where, for instance, the Milky Way core will be. You can then take your proper shots with a lower ISO.
If using a star tracker, you can also use a lower ISO as you will be capturing more light with the longer exposure time.

Shooting Raw
Another key setting is to make sure you are shooting RAW images and not jpegs.
When shooting jpegs the camera is doing a degree of image processing for you but then giving you less data to work with in post-processing and so reducing its potential.
In raw mode, you get images that might not look as good when viewing on the camera, but they are retaining more data for you to use later.
Landscape Astrophotography Post-Processing and Editing
Once you have had your photography session under the night sky, you need to being those images home to make the most of them using software for post-processing.
Popular software includes Photoshop, LightRoom, or Affinity Photo.
We are not going to go too in-depth into the process here, other than to touch on stacking and stitching.
Landscape Astrophotography Stacking
Stacking in astrophotography is the process of taking multiple images for a single composition and then laying them on top of each other using software.
Stacking increases the signal-to-noise ratio (SNR) of your images, by bringing out the elements you do want (i.e. the stars and astronomical objects), and by reducing the noise.
Stacking enables you to bypass the limits of your gear on your exposure time.
This is especially useful if not using a star tracker, as your maximum shutter time may be quite short (see the calculations above for working this out for you).
Landscape Astrophotography Stitching
Image stitching is the process of taking multiple narrow shots and putting them together with software to make a single composition.
Stitching is especially used with shooting panoramas and Milky Way panoramas.
This is a particularly useful technique if you have a fast aperture lens that isn’t wide enough to capture the whole landscape you want in your image.
Examples of this would be 50mm f/1.8 or 35mm f/1.8 lenses. These popular lenses are great for any type of photography and they are usually pretty cheap.
If you have one of these lenses and are comfortable with it then it may be that you would prefer to have a go at shooting with it first, rather than investing in a new wide-angle lens.
The other key bits of gear that you will need are a very sturdy tripod and a good ballhead that allows you to pan the camera smoothly from left to right without being knocked up or down.
The downside of stitching is that you need to spend time using software like PhotoShop or Lightroom to put it all together.
More Landscape Astrophotography Tips
For further advice, this video talks about much of what we have covered below and the creator is a fantastic landscape astro photographer:
Once you have done all of this and put in the practice, you should have some great images to share.
If you have any questions please leave them in the comments below.
We hope you found this useful and our analysis original. You can find some other articles of interest to you below.
Related articles:
