Here are the Nikon Z6II Astrophotography Settings you should use for photographing the night sky.
Nikon Z6 II Astrophotography Settings
- Program Mode: Manual
- Exposure Length: 15-30 seconds
- Aperture: As wide as possible
- ISO: 400-4000
- File Format: RAW
- White Balance: Auto
Nikon Z6 II Astrophotography Settings in Detail
Program Mode
- Always use the Manual or Bulb mode.
- This allows you to have complete control over the exposure length, aperture and ISO.
- In particular, Bulb mode allows you to use very long exposure times of up to 900 seconds
Exposure Length/Shutter Speed
- You want to use a long exposure, but not so long that stars begin to trail due to the Earth’s rotation.
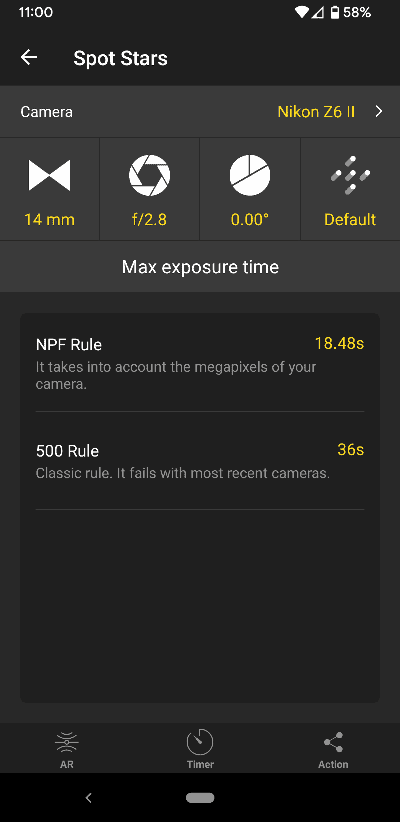
- A common rule of thumb is the 500 Rule, which suggests using a shutter speed of 500 divided by the focal length of the lens. For example, with a 14mm lens this would be 36 seconds (500/14 = 36).
- A more accurate calculator is the npf rule, using the Nikon Z6 II camera with a 14 mm lens at f/2.8 would give you 18.5 seconds.
- If you are using a star tracker, then you can use a much longer exposure time, going beyond the standard 30 seconds up to 900 seconds using the Bulb mode. This is particularly useful if you’re capturing deep-sky objects using a star tracker.
Aperture
- Set your aperture to its widest setting to allow as much light in as possible. This is determined by the lens you are using. F/1.8 is great, F/2.8 is also ok.
- See the best lenses for astrophotography for more information on this.
ISO
- Start with an ISO setting around 400.
- High ISO increases sensitivity to light but also increases noise. You may need to adjust this based on the ambient light conditions and your lens’s capabilities.
- You may need to go up to 4000. This is something to experiment with.
- You can also use a very high ISO as a kind of night vision hack to help you compose the image. Effectively you jack the ISO up and you get to see how it will appear on the live view screen before putting it back down to take the photo.
- This will also be different if using a star tracker as you can go for a much lower ISO given that you will use a longer exposure time.
Image File Format
- Choose RAW or RAW+ JPEG.
- RAW files capture more data and are better for post-processing. JPEGs are effectively processed in the camera and so look better at first but are not reaching their full potential.
Manual Focus
- Turn off any autofocus as it will not work on faint targets like stars.
- You need to use manual focus on a star by zooming in on it and getting it sharp. This is easiest with a live view screen.
White Balance
- Daylight or Auto
Delay Timer
- Unless you are using an intervalometer or remote release (see below) you should set a delay so that you do not cause the camera to shake when you press the shutter release (this will ruin an astrophotography image!).
Saving Your Nikon Z6II Astrophotography Settings
One final tip is to use the Nikon Z6 II’s capacity to save settings.
The idea of saving preferred astrophotography settings to user modes (U1, U2, U3) on the camera can be a convenient tip to quickly switch to your favorite night photography settings.
Other Gear and Settings
Lens
- With your lens, you usually want a short focal length to allow you to capture a wide expanse of the night sky. Anything up to 35mm should be usable, but around 14mm tends to be optimal.
- If you are using a lens narrower than this (for example, 50mm), then you can try taking multiple images and stiching them together, but this is a more advanced technique and requires more work.
- In addition, having a fast aperture is essential. This is the best indicator of a len’s capacity to operate in low light.
- See the best lenses for astrophotography
Tripod
- You want a steady and sturdy tripod. See the best tripods for astrophotography if you need a new one.
Intervalometer/Remote Release
- An intervalometer or remote release can be very useful for allowing you to control your camera without physically having to touch it.
Further Information and Sources
- Derek Horlock: Nikon Z6 II Astrophotography Case Study
- Testing the Nikon Z6 for Astrophotography
- What’s the Best Focal Length for Astrophotography?
- Free 500 Rule Calculator
- Free NPF Rule Calculator
- Landscape Astrophotography: 5 Steps to Beautiful Nightscapes
- Nikon Z6 II Online Manual

