Light pollution in cities is the nemesis of the astrophotographer and astronomer, or is it?
The night skies are increasingly brightening in urban areas and this makes seeing and photographing stars and other astronomical objects much harder.
The most recommended solution to this is to travel to a dark sky site to take photos, but this is not always practical and if this was the only option then many city-dwellers would have no chance to get into astrophotography.
Like most people, I have a family and a job and so making an overnight astrophotography exhibition can be difficult. Luckily there are things you can do to improve your results closer to home, even in light polluted cities.
This article outlines nine tactics you can employ for astrophotography in the city and get excellent results.
1. Time Your Sessions
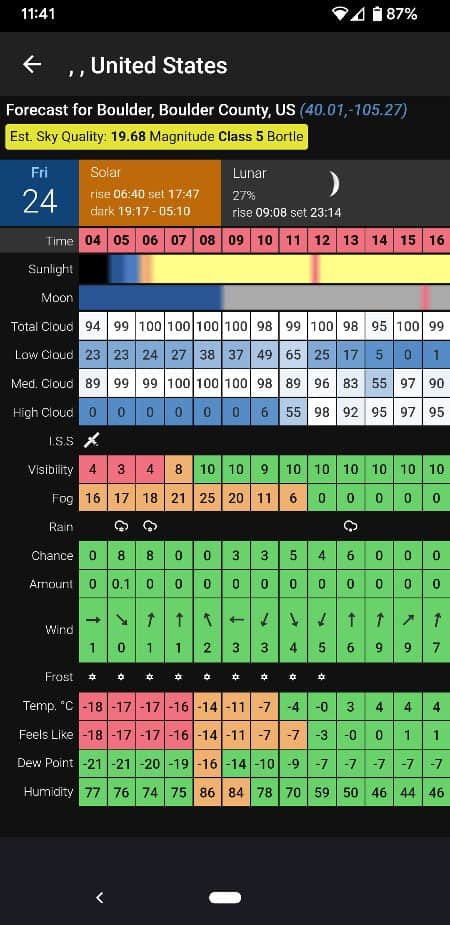
The first, and most basic step, is to make sure you plan to be out shooting when the time is right.
By “right” I mean, in particular no moon in the sky (a new moon). The moon reflects sunlight and brightens the night sky. This is effectively extra light pollution that can be avoided by going out on the right nights.
You can search on the internet to find out the moon’s phases and see when the next opportunity is for the darkest skies for you.
You can also use some great astrophotography apps to help plan your timing, and our guide to landscape astrophotography has more detail on how to plan your session out shooting the night sky.
2. Take Long Exposures
This might be obvious, but you want to take as long exposures as your gear will allow you to.
This is because you are shooting in low light and you need to keep your camera’s shutter open for as long as possible (with your lens aperture as wide as possible) to capture the maximum amount of light you can so that the stars start to pop through.
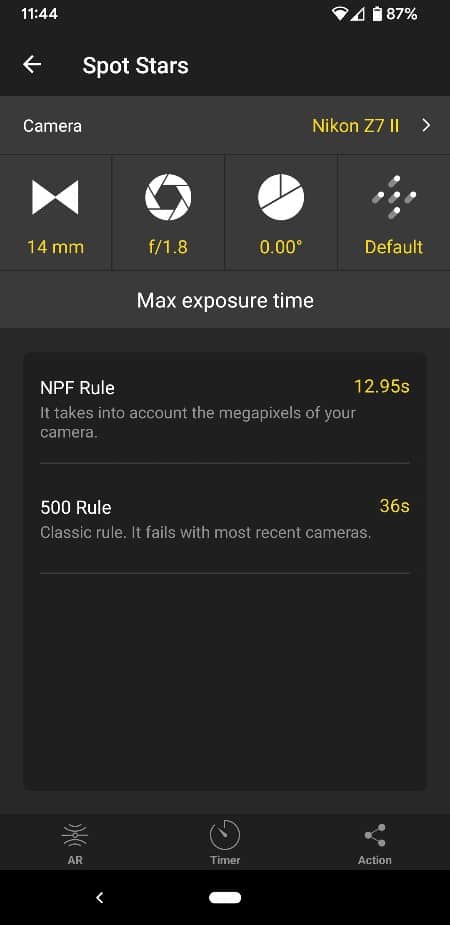
The limits to your exposure time come from the camera and lens you use. If you try for too long then there will be star trailing as they are “moving” in the sky when you shoot (or rather the Earth that you are standing on is rotating). This means that they will not be sharp, which is what you want for a great astrophotography image.
Luckily there are a couple of formulas that you can use to calculate your optimum exposure settings and we have free calculators that you can use for this:
- NPF Rule Calculator – the most accurate but requires more information to be input
- 500 Rule Calculator – less reliable, but very simple and easy to do
3. Use a Star Tracker
One piece of gear that you can add to your setup of camera, lens and tripod is a star tracker.
These are small equatorial mounts that sit between your camera and tripod and move your camera when shooting in sync with the rotation of the earth.
This means that you can take much longer exposures without any star trailing occurring (and you can use a lower ISO setting to reduce noise).
They are small, portable devices and usually cost a few hundred dollars.
See our article to find out the best star trackers based on data examining nearly 700 of the best astrophotography images in the world.
4. Stack Your Images
An alternative to adding a Star Tracker to your setup is to take multiple, shorter images and stack them in post-processing software.
This is the process whereby you have more than one image (the more the better) that is near identical and then the software layers them on top of each other. This brings out the stars whilst reducing the noise.
You can watch this video to give you a good overview of how this works with a free tool called Sequator:
5. Use an Astro-Modified Camera
A way to make your regular DSLR or Mirrorless camera work better for capturing astrophotography images in the city is to astro-modify it.
This is a process where part of the infrared filter within the camera is removed to make it better at seeing the colors from deep sky objects.
It is a permanent process and, although there are tutorials on YouTube, we’d recommend using one of the services that exist for this. You can send your camera there or buy a pre-modified one.
Read more about this and see how to get it done in our article on Astro Modified Cameras.
6. Use a Light Pollution Filter
Light pollution filters exist for exactly the purpose of astrophotography in a city.
You can get them for DSLR/mirrorless cameras and also for dedicated astronomy cameras.
Watch this video for a good overview of the options and what they can deliver.

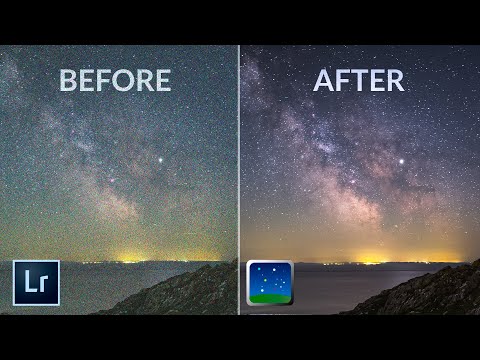
7. Expose to the Right (ETTR)
ETTR (Expose to the Right) is a tactic in photography where you intentionally overexpose your image in order to collect as much light as possible. As we know, capturing the maximum light we can is what we need to do.
The value of this for city astrophotography is that you can take an image that will appear unusable when reviewing on your camera but when you bring it back to Lightroom, or your chosen post-processing software, you can correct the exposure settings and bring out the stars and detail that you want to see.
This video gives a good overview of ETTR for astrophotography:

8. Focus on Planetary and Deep Sky Imaging
Most of this article has focussed on improving your landscape astrophotography in the city, but rather than waiting for the perfect conditions to go out at night and try and capture that perfect Milky Way image a good option is to switch your focus to planetary or deep sky astrophotography.
The advantages of this are that you can do it from your backyard and you will be taking very long exposures to overcome light pollution.
Gear that you will need to do this will include:
- CCD or CMOS Astrophotography Camera
- Astrophotography Telescope
- Astrophotography Mount
- Narrowband Filter
DSO and planetary imaging is a bigger step than, say, from landscape photography with a DSLR to landscape astrophotography, but there are advantages and it opens up new opportunities.
This video gives a good overview of how to get great results with deep-sky astrophotography from a city:

9. Buy a Smart Telescope
Smart Telescopes have been disrupting the astronomy/astrophotography world in recent years.
They are telescopes with in-built cameras that you control from your smartphone and they pretty much automate the whole process of finding and imaging objects in space.
They track and take long exposures to gather enough light for whatever it is you want to photograph and it gets sent straight to your phone.
Some models feature an eyepiece that provides a digital view of the galaxy or whatever it is you are imaging as the light is being gathered. This is an effective solution to the problem of light pollution for astronomy in the city, as the longer exposure compensates for the light pollution and allows you to view things you otherwise would not unless you were in a dark sky site.
The simplicity is amazing, with the inevitable downside being that they are pretty expensive (in the thousands of dollars).
Read our guide to the best smart telescopes to understand more.
Verdict: Astrophotography in the City
Can you do astrophotography in a city? Yes. It’s definitely harder to get results, but far from impossible.
It’s a similar thing with whether you need the best camera for astrophotography or just the entry-level DSLR you have at home. It’ll be harder without the greatest $3000 camera, but it is just one of many factors that go into putting together great astrophotography images.
This includes how dark the skies are where you are taking the photo, and also the timing and conditions on the day you are shooting.
Add to this the other variable parts of your gear setup like tripod and lens, and the settings you use for shutter speed, aperture, ISO etc.
Astrophotography is more art than science in this sense, in that there are no perfect conditions, no perfect setup, and no perfect settings. It’s just you learning what works with what you have and where you are.
Related articles:
