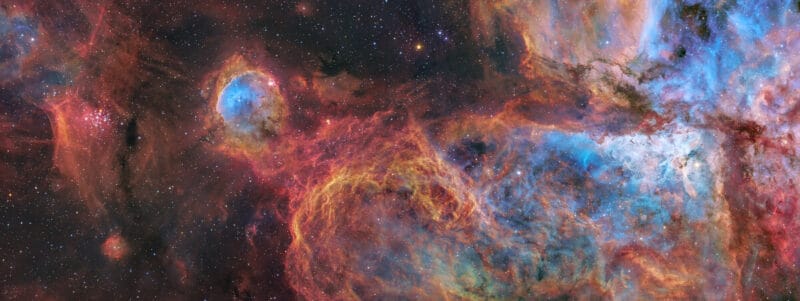
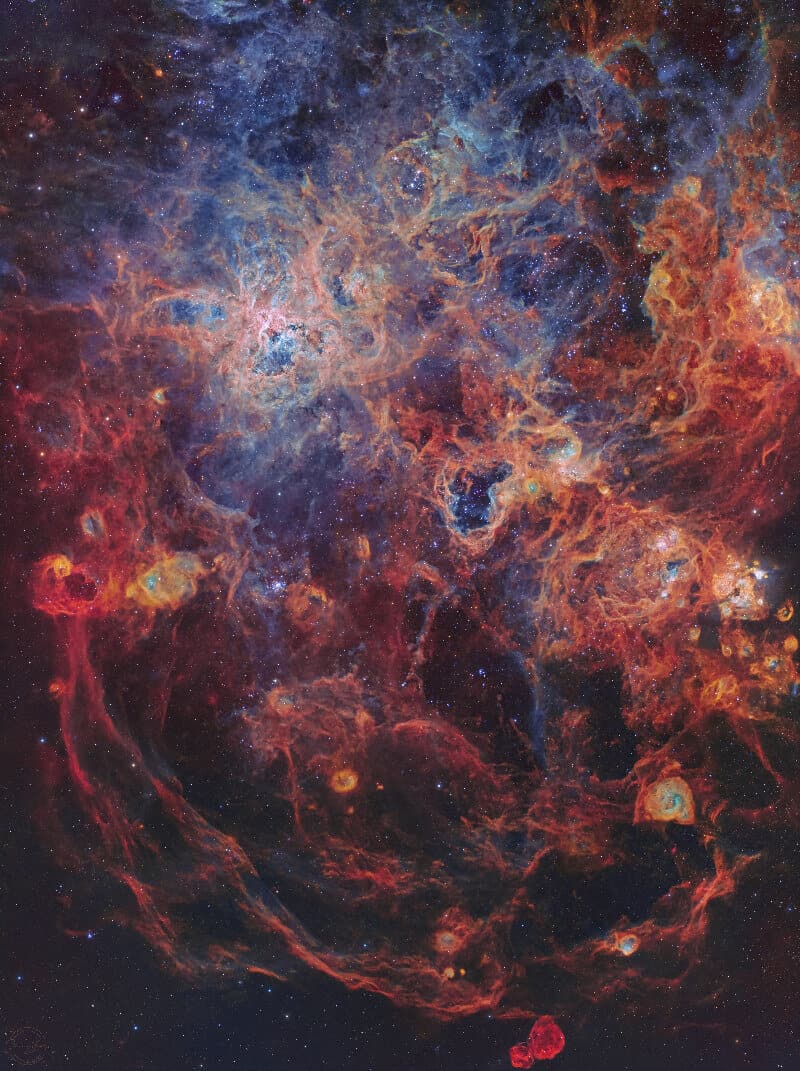
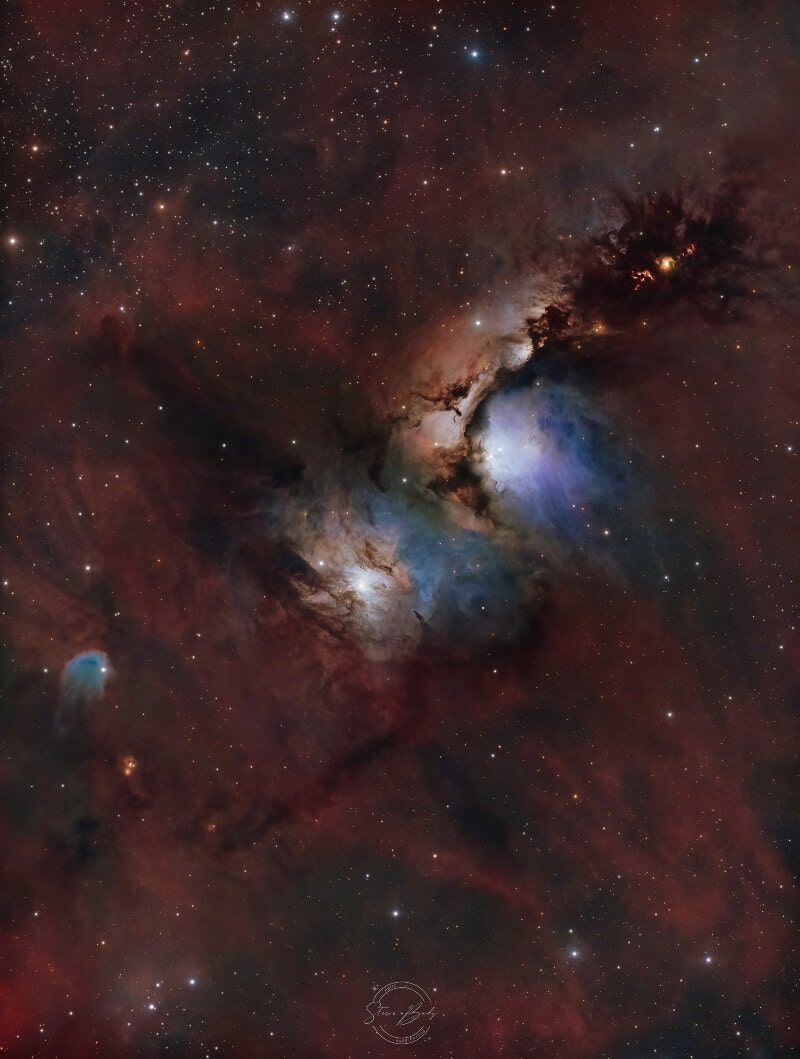
Steeve Body is a multiple award-winning deep sky astrophotographer from Melbourne, Australia.
In this interview he discusses how he captures his amazing images and provides a detailed overview of how he uses software like PixInsight and Photoshop to make the most of the data he acquires.
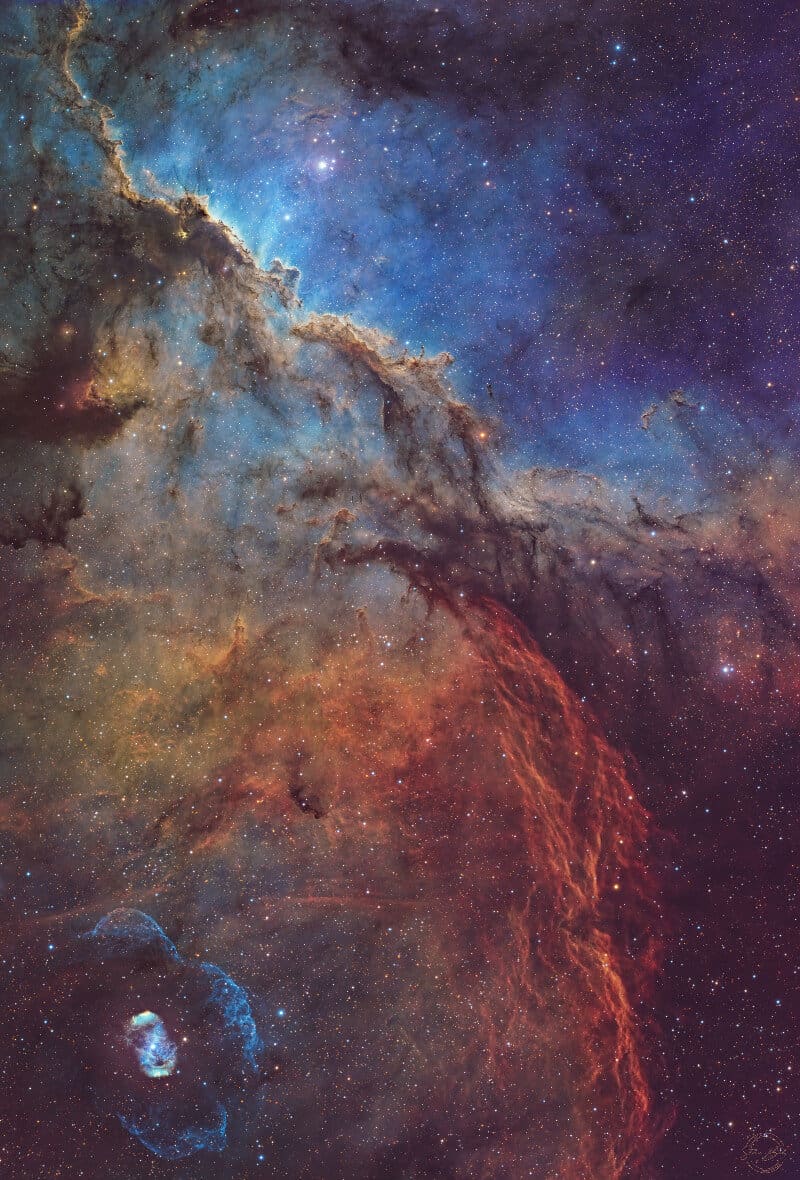
“I consider the composition to be of utmost importance. My aim is to create images that not only have an emotional impact but also captivate and maintain the viewer’s attention”
How Do You Plan and Capture Your Images?
Most of my images are captured right from my home setup in a suburban backyard in Melbourne, which is well-suited for narrowband imaging.
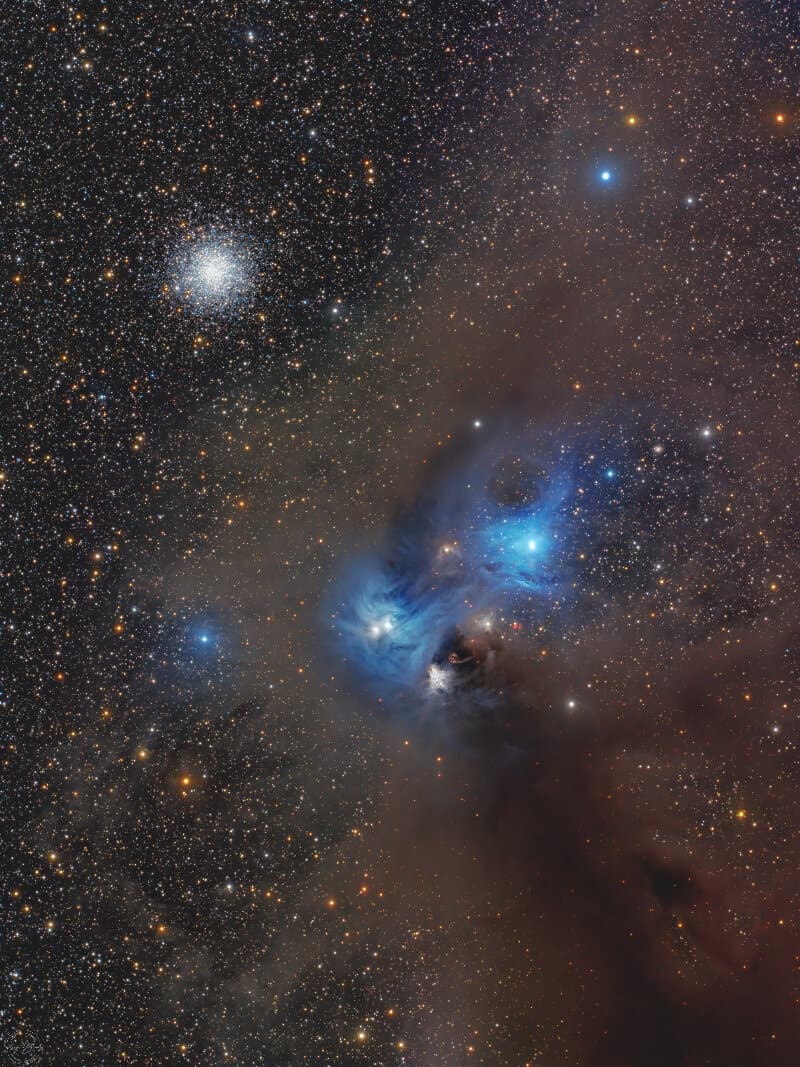
However, for broadband imaging, I travel to darker skies in Bortle class 1 and 2 zones. Fortunately, in Australia it only takes a couple hour drive in any direction to reach these type of skies!
A significant amount of my time is invested in planning for my images using NINA’s framing assistant. I consider the composition to be of utmost importance. My aim is to create images that not only have an emotional impact but also captivate and maintain the viewer’s attention.
I use compositional techniques like the rule of thirds, diagonal lines, triangles, golden ratios, and spirals to find the right fit and balance.
I typically visit Astrobin to search for a wide-field image of my intended target, then spend time in Photoshop with the cropping tool playing with framing up until I get a composition that feels right.
When building sequences in NINA (Nighttime Imaging ‘N’ Astronomy), I try to start early in the season if I can, especially with Melbourne’s weather, to accumulate substantial integration time, often taking me 2 to 3 months to reach my integration target.
NINA offers tools for planning sequences, like determining the best day for shooting in RGB and Oiii when the moon is not visible and considering the altitude of the target. However, due to the unpredictable weather where I live, I often have to make decisions based on the data I need to complete an image…
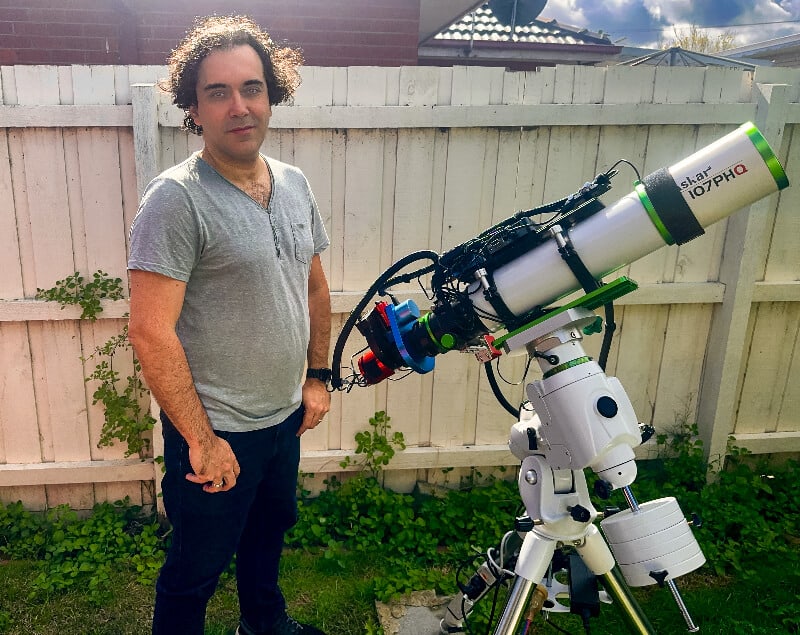
What Equipment Do You Use?
My setup is:
- Telescope: Askar 107PHQ
- Imaging Camera: ZWO ASI1600MM Pro
- Mount: Sky-Watcher EQ6-R Pro
- Filters: A full set of Antlia 3nm Narrowband and Pro series for specific colours.
- Accessories: Intel NUC 8, Pegasus Astro Falcon Rotator, Pegasus Astro Pocket Powerbox Micro, Pegasus Astro Scops OAG, and ZWO EAF.
You can see how this fits together in this photo:
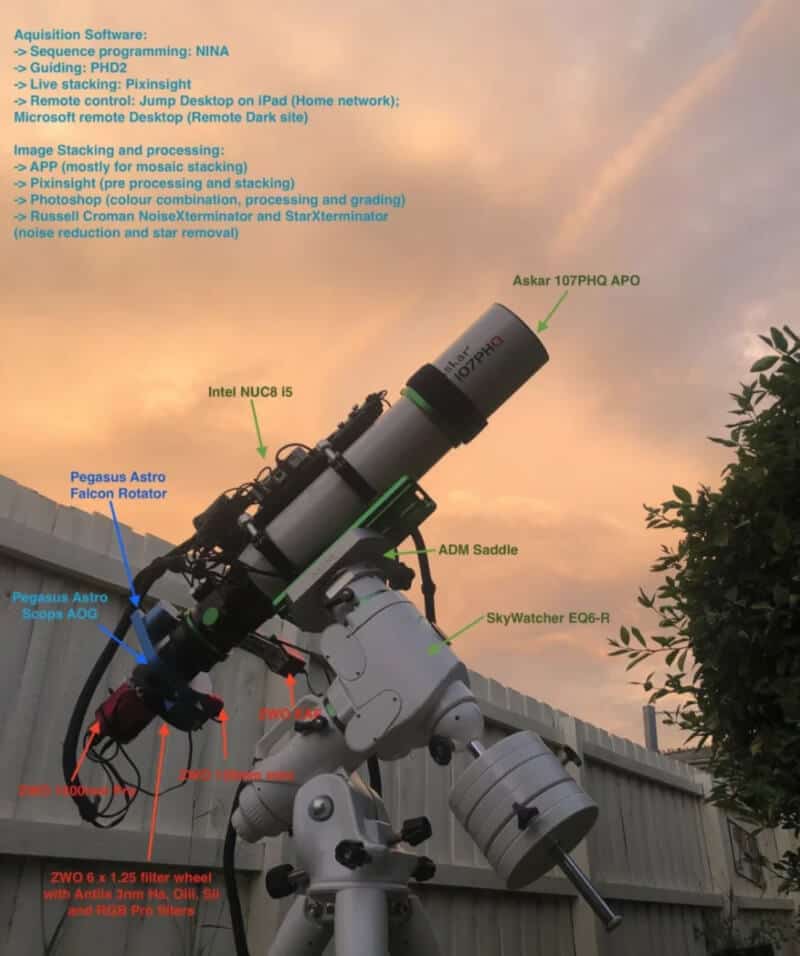
Automation plays a crucial role in my setup, with the goal of achieving remote operability so that one day my rig can be permanently located at a dark site.
My Camera
I’m currently using an older monochrome camera (the ZWO ASI1600MM Pro) which, by today’s standards, might be considered outdated.
The reason I stick with it is that it came as part of a very good deal on second-hand equipment, complete with a filter wheel.
The 4/3 sensor size also allows me to use really good quality filters without depleting my bank account!
Of course, I’d like to upgrade to something like a ZWO ASI2600MM Pro or even a ZWO ASI6200MM Pro, but the cost of upgrading both the camera and the filters simultaneously is prohibitive at the moment.
I wish manufacturers would develop another 4/3 sensor that meets modern specifications so I wouldn’t have to change my filters.
My Mount
With regards to the Sky-Watcher EQ6-R Pro, its success for me is its simplicity and price point.
The EQ6-R guided around 0.5 arc-second precision straight out of the box for me, and it’s relatively affordable compared to other mounts. This makes it an ideal astrophotography mount and its payload is suitable for many focal lengths.
It’s also commonly acknowledged by many astrophotographers and retailers as a reliable choice. Although it’s a hefty mount, it provides excellent value for money.
While it’s not quite an observatory-class mount since it lacks a home sensor, it has proven to be very reliable for me.
What Software Do You Use?
I use these as part of my capture and processing workflow:
- Adobe Photoshop
- Pleiades Astrophoto PixInsight
- Russell Croman Astrophotography BlurXTerminator
- Russell Croman Astrophotography NoiseXTerminator
- Russell Croman Astrophotography StarXTerminator
- Stefan Berg Nighttime Imaging ‘N’ Astronomy (N.I.N.A. / NINA)
Pre-Processing
Stacking
- I begin by meticulously inspecting each frame using PixInsight’s Blink tool, eliminating any with imperfections.
- Then I load my lights and calibration frames into Weighted Batch Preprocessing (WBPP) with the ‘no compromise’ preset selected.
- I apply a 2x drizzle to all images, noting that during capture, each frame is dithered by 10 pixels.
My main reason for applying 2x drizzle during stacking is that the up sampling interpolation happens at a single frame level before getting stacked which produce very smooth up sampling results and I can get a lot more detail out of the image when using deconvolution later on.
I also end up with a master image that has a high enough resolution for me to produce large prints.
Background Extraction
- Gradient removal follows, where I use GraXpert as I found it often outperforms PixInsight’s Dynamic Background Extraction (DBE).
Of late, I’ve integrated their AI interpolation method, which has markedly improved the process.
Dynamic PSF and Deconvolution
- I then use the PixInsight Dynamic PSF tool on each image, capturing the average Full Width at Half Maximum (FWHM) from the stars in the centre of the image.
- I then enter this value in BlurXTerminator (BXT) on each narrowband (NB) image to enhance the clarity and details.
- I do the same for my RGB image where I pay special attention to star reduction, carefully adjusting the ‘star halo’ parameter to preserve the colour integrity of the image.
Color Calibration
- The final step in pre-processing is applying Spectrophotometric Color Calibration (SPCC) for colour calibrating the RGB image in PixInsight.
Post-Processing
Image Stretching
Once preprocessing is complete, I commence the stretching phase, which is in my opinion probably the most important part of the process.
- My method varies with each image, but I consistently start with a ‘standard stretch’ using Histogram Transformation in PixInsight.
- This serves as my benchmark. I then use General Histogram Stretch (GHS) to attempt to surpass the results of the Histogram Transformation.
GHS is formidable, it gives me control over contrast application and can significantly enhance or recover the dynamic range of an image. However, it requires a delicate hand. It’s all too easy to overstretch and degrade the image to a point of no return and make it look flat.
This is why I always establish a baseline with Histogram Transformation, then carefully work with GHS to improve upon it whilst trying to maintain in integrity of the light.
It can be a trial-and-error process requiring patience. GHS’s ability to manage highlights and shadows lets me unveil the intricate structures within the cores of nebulas and galaxies, like an HDR composition and maintains the integrity of stars and their colour profiles during stretching.
For each narrowband filter, I apply this stretching method and then focus on the RGB images solely to refine the stars. This means a different approach to stretching, often using more iterations with gradual colour saturation.
Noise Reduction
NoiseXTerminator (NXT) is my primary tool here.
For exceptionally faint objects, where exposures can reach 100 hours in Oiii, I may apply noise reduction techniques like MultiscaleMedianTransform (MMT) with PixInsight before stretching, followed by NXT on the stretched image.
In general I will often prefer to apply a small amount of noise reduction at different stage of the process rather than apply a lot of noise reduction on a single stage
Star Removal
At this stage I like to remove the stars on my narrowband images and only work with starless images and extract the stars from my RGB image to then be integrated back into the final images at a later stage
Depending on the image, I sometimes remove stars using StarXterminator before stretching, particularly when dealing with filamentary structures.
For faint emissions, I remove stars in the linear state, allowing a more effective stretch of the nebulosity.
“I find striking parallels between the art of mixing music and the visual craft of processing astrophotography”
Post Processing in Photoshop, LightRoom and PixInsight
My affinity for Photoshop in the post-processing phase stems from its robust layering system.
As a sound mixer by trade with over two decades of experience, I find striking parallels between the art of mixing music and the visual craft of processing astrophotography. I guess there are both waves after all!
The process of preparing and editing audio is remarkably similar to the pre-processing I conduct in PixInsight, organising and refining all elements before they come together.
This initial phase is quite technical, engaging the logic and precision skills which I prefer to do before I do the creative part of the process.
It’s in the subsequent phase this is where creativity takes centre stage, blending and balancing the distinct layers to compose a harmonious whole.
Here, Photoshop’s capabilities offers a non-destructive workflow that allows me to continuously refine the outcome. Each adjustment is visible in real-time, providing me immediate feedback on the interplay between layers which I find paramount in getting the result that I want out of my images.
If PixInsight offered a layered workflow, I might forgo Photoshop entirely. Alas, it seems the developers have not prioritised this feature. Therefore, for the flexibility and control required in the nuanced phases of post-processing, I predominantly turn to Photoshop:
- I export all data from PixInsight as 16-bit TIFF files, importing my Ha, Sii, and Oiii starless layers, along with RGB stars, into Photoshop.
- I adjust the blending modes for each to map them to the desired colour channels, such as SHO, and overlay the stars on top of the starless blend.
- Using curves and levels on each filter, I aim to have at least four distinct colours (blue, yellow, purple, and green) shine through.
- I often adjust green hues towards red or orange using Photoshop’s selective colour tool. Sometimes, creating a separate HOO blend is necessary, which I then incorporate into my SHO blend to attain Ha’s natural red appearance.
- The palette I aim for typically includes red for Ha, purple where there’s a blend of Ha and Oiii, yellow for a mix of sulphur and Ha, and blue and cyan for oxygen.
- The right colour blend depends on the target; some blends, like SHO can work almost immediately on some targets with only a few level tweaks, while others require significant effort to achieve a pleasing aesthetic, such as NGC1670, which necessitated a dynamic HOO blend made using pixelmath in PixInsight combined with my SHO blend in Photoshop.
- A separate luminance image is created by blending Ha, Sii, and Oiii to include all morphological structures. This requires careful adjustment, often reducing the Ha intensity while enhancing Sii and Oiii to accurately reflect all emissions in a natural-looking way.
- This luminance layer is then added over the colour image as a luminance channel, and I manipulate it with curves to control the overall luminance intensity.
- Finally, the completed starless RGB and luminance layers are exported to Lightroom for final colour grading.
- The image is then brought back into PixInsight, where I reintroduce the stars using a reverse stretching method to maintain their colour fidelity but most importantly without clipping then which can sometime happen with screening the stars back into the image. If necessary, I apply a slight star reduction and a subtle noise reduction.
- The image then is downscaled to the camera’s native resolution for online publication as a JPG whilst keeping the master copy at the 2x drizzled resolution in TIFF format.
Can you outline your plans for 3D Nebulae Conversion and Virtual Reality Experiences?
My current project involves transforming my nebula photographs into three-dimensional space with the highest fidelity.
The goal is to leverage my background as a music composer, sound designer, and Dolby Atmos sound mixer to forge unique, immersive space experiences.
I am considering a PhD to delve deeper into this innovative intersection of astrophotography, 3D visualisation, and immersive audio design.
Although I’m in the early stages of development of this project, I believe this could significantly advance the fields of visualisation and immersive experience design.
However, given the infancy of this endeavour, I prefer to keep the details under wraps, aiming to share more as the project materialises.
You can see a short video here of the Southern Tadpoles with accurate 3D Star mapping:

Can You Recommend Any Learning Resources For Other Astrophotographers?
For learning and development in astrophotography, I recommend joining your local astronomy club to talk to fellow astrophotographers. This community is more often than not very generous and supportive.
Examining images on Astrobin can also provide inspiration and technical insight.
YouTube is pretty amazing as well and offers a wealth of resources:
- Channels like Photon Millennium, despite being in French, is really great for PixInsight tutorials
- PatriotAstro for NINA is great
- The Astro Imaging Channel caters to a range of expertise levels and is full of invaluable information
There are also astrophotographers offering one on one session for a fee which can be really helpful was well. Names like Adam Block, Bray Falls, and Andy Campbell comes to mind. They are great astrophotographers and teachers.
I also started to offer similar services which you can find on my website.
About You – Steeve Body
You can find out more about my astrophotography pursuits on my website, steevebody.com.
I’m also active on Instagram and Facebook.
My memberships include The Astronomical Society of Victoria and the Astrobin community, through which I share my passion for astrophotography with the local and international community.
