Yes, your iPhone can photograph the Milky Way.
Not a vague smear of light. The actual Milky Way, with structure, colour, and foreground. iPhones from the 11 onwards have a Night Mode that, when you know how to push it, will give you a 30-second exposure under dark skies.
You do not need a DSLR for this. You do not need to spend thousands on a camera. What you need is the right technique, a tripod, and a dark sky. This guide covers all three.
If you want the broader picture of iPhone astrophotography (star trails, moon shots, deep-sky targets), head over to the iPhone astrophotography guide. This article is specifically about the Milky Way with Night Mode.
Which iPhones can shoot the Milky Way?
Night Mode arrived with the iPhone 11. Any model from the 11 onwards has it, including all SE (2nd gen and later) models.
The distinction that matters is exposure length.
iPhone 11 and later (all models) go up to 10 seconds by default. iPhone Pro models from the 12 Pro onwards, and the iPhone 15 and 16 standard models, unlock 30 seconds when the phone is on a tripod in true darkness. That extra 20 seconds is a real jump in how much light you pull in.
If you have an iPhone 10 or earlier, Night Mode is not available and you will need a third-party app. The rest of this guide assumes iPhone 11 or newer.
Turn on Apple ProRAW before you go out
Enable ProRAW at home, in the daylight, so you are not fiddling with settings in the dark.
- Go to Settings > Camera > Formats
- Toggle on Apple ProRAW
- In the Camera app you will now see a RAW button in the top corner. Tap it to activate before you shoot.
By default your phone saves JPEGs. A JPEG has already been processed and compressed, with some of the data discarded. That is fine for a photo of your dog. For astrophotography it is limiting, because the software decisions baked into a JPEG are not always the ones you would make yourself.
A ProRAW file keeps all the captured data. It will look flat and underexposed straight out of the camera. That is expected. In Lightroom Mobile you can pull the shadows, adjust white balance, and recover detail that simply does not exist in a JPEG.
The file size is larger, so remember to switch back to JPEG for everyday shooting.
Step-by-step: shooting the Milky Way with Night Mode
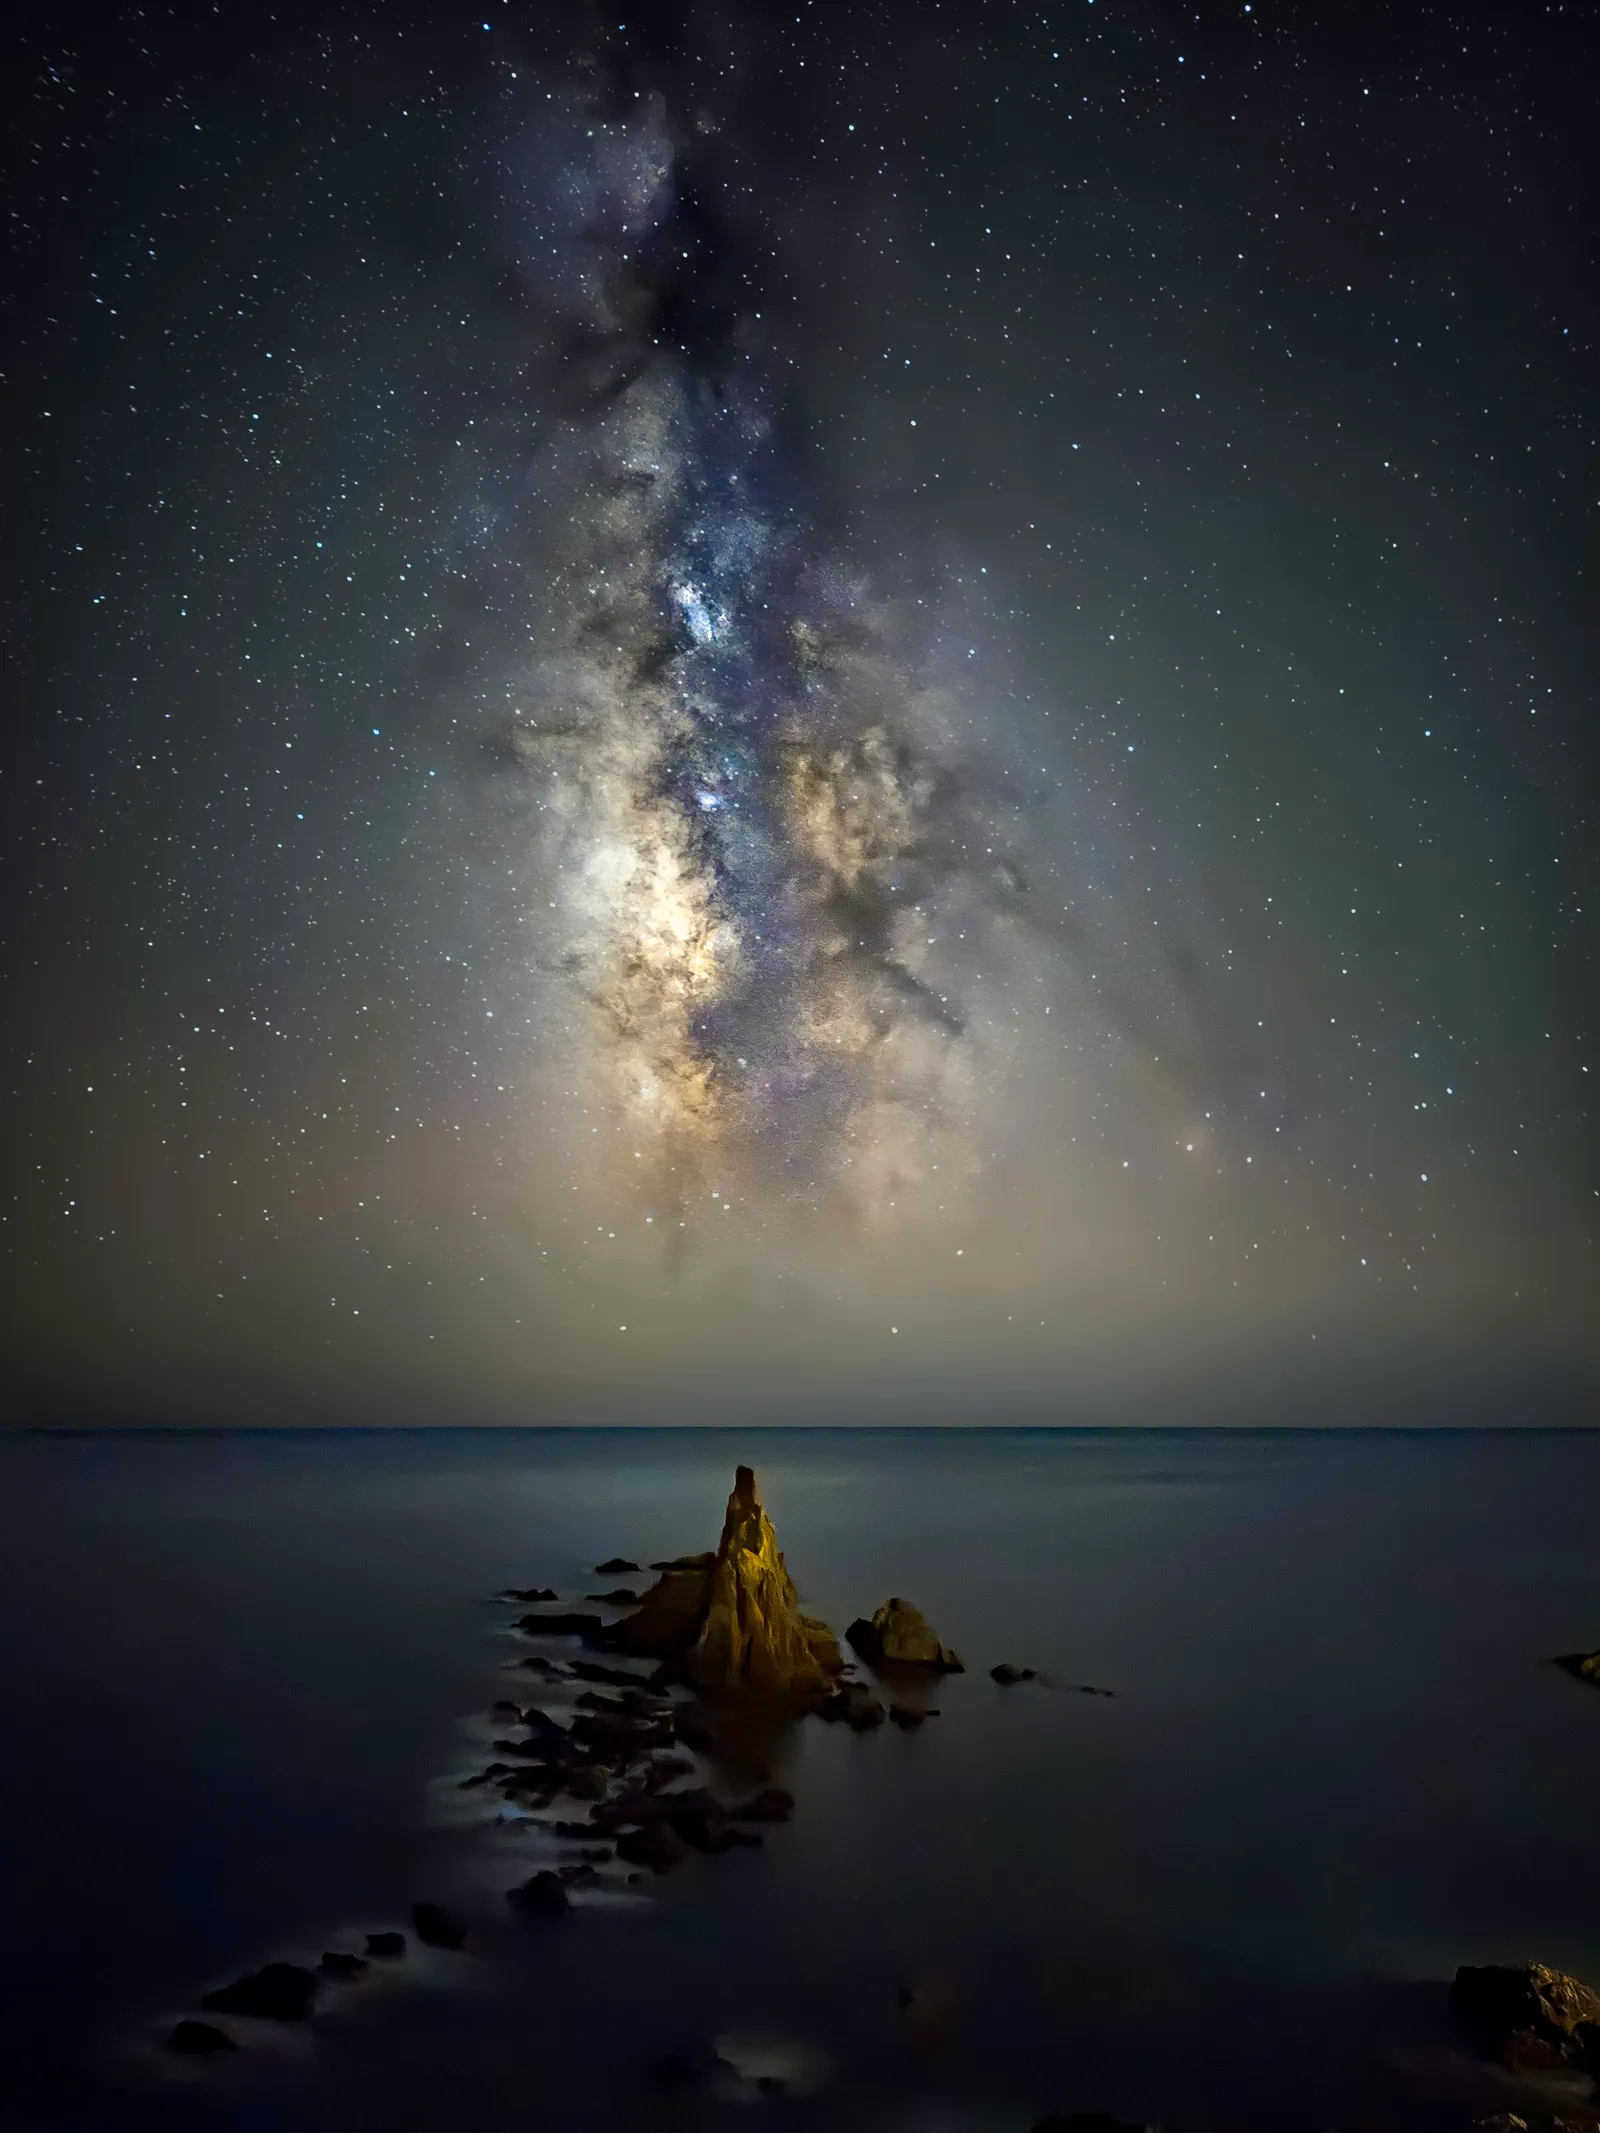 iPhone 16 Pro, Night Mode 30s. Photo: Alvaro Ocaña, Smartphone Astrophotographer of the Year.
1. Get under a dark sky
Night Mode cannot overcome light pollution. You need to be away from town. Use a dark sky map to find a site with a Bortle scale rating of 4 or lower. Check the moon phase too. A full moon will wash out the Milky Way even in a dark location.
2. Mount your phone on a tripod
This step is not optional. Without a tripod, your maximum Night Mode exposure is around 3 seconds. On a tripod in genuine darkness, the phone detects that it is stable and unlocks 30 seconds. That single change is what makes the Milky Way possible.
Use a phone tripod adapter (they cost very little) and a solid travel tripod. Even a GorillaPod wrapped around a fence post works.
3. Set your composition, then use the self-timer
Frame up the Milky Way core. In the Northern Hemisphere during peak season it sits roughly south to south-east. Include some foreground: a silhouetted tree, a stone wall, a mountain ridge. Tap the screen to set focus and exposure on the stars rather than the foreground.
Use the 3-second self-timer (the clock icon in the Camera app) or a Bluetooth shutter remote. Touching the phone to tap the shutter introduces vibration, which blurs the stars even on a tripod.
4. Activate Night Mode
Night Mode does not turn on manually in a bright room. The phone has to detect low light first. Once it is dark enough, the yellow crescent moon icon appears automatically.
To push it to its maximum:
- Tap the chevron (or the six-dot icon at the top of the camera screen) to expand the tool options
- Tap the Night Mode icon. It shows a number, which is the current exposure time in seconds.
- Tap again to increase it. It steps through 5s, then 10s.
- On a tripod under dark skies, the phone should detect the conditions and offer 30s. Drag the slider to MAX.
If you are only seeing 10s as the maximum, the phone is not convinced it is stable. Check the tripod is not vibrating and that you are using the self-timer.
 iPhone 16 Pro Max, Night Mode 30s. Photo: Zahari Dimitrov, Smartphone Astrophotographer of the Year.
5. Shoot, then check
After the 30-second exposure completes, zoom in on the stars. If they are trailing (short streaks rather than points), the tripod likely moved, you touched the phone, or the sensor’s stabilisation worked against you. Reshoot with the self-timer and check the tripod feet are firm.
Use the main camera, not the ultrawide or zoom
Your iPhone has multiple cameras on the back. The 1x view is the main camera. The 0.5x is the ultrawide. The 2x, 5x, or whatever your model shows are telephoto cameras.
For Milky Way photography, shoot at 1x.
The ultrawide is tempting because it captures more sky, but it has a smaller sensor and a slower lens. The image will be noticeably noisier. The telephoto cameras are worse still, they reduce the effective aperture and quality drops fast at these exposure times.
Start at 1x. Once you have a clean shot, experiment with the other cameras if you want to, but 1x is the one to use.
Watch: iPhone’s hidden 30-second Night Mode

How to unlock the full 30-second Night Mode on iPhone for Milky Way photography.
Going fully manual with Halide or ProCam
Night Mode handles most situations well and is the right starting point. But if you want full manual control over ISO, shutter speed, and white balance separately, the built-in Camera app on iPhone does not offer it.
You will need a third-party app. Halide and ProCam are the two most popular options. Both give you manual mode control equivalent to what Android phones offer natively.
A good starting point for Milky Way photography:
- Shutter speed: 30 seconds (reduce to 20s if the stars are trailing)
- ISO: 1600 (you can go higher, but noise increases quickly)
- White balance: 3500K to 4000K (prevents the orange or blue cast you get on auto)
- File format: RAW
- Resolution: 12 MP (the default main camera resolution)
Manual mode takes more trial and error than Night Mode, but once you find settings that work for a given sky, you can repeat them reliably.
 iPhone 16 Pro, Night Mode 30s. Photo: Anibal Garrido, Smartphone Astrophotographer of the Year.
Quick edit in Lightroom Mobile
Processing makes a noticeable difference, especially with ProRAW files.
Open Lightroom Mobile, import the RAW file, and work through these adjustments:
- Exposure: bring up slightly if needed
- Highlights: pull down to recover blown-out stars
- Shadows: lift to reveal foreground detail
- Whites/Blacks: set to taste
- White Balance: shift toward 3800-4200K for a natural sky colour
- Noise Reduction: apply carefully; the Lightroom AI Denoise tool works well on mobile RAW files
- Texture/Clarity: a small lift brings out Milky Way structure
Aim for something that looks like what your eye saw, not a neon poster. The competition photos on this page are a good reference for what Night Mode can realistically produce.
 iPhone 15 Pro, Night Mode, multiple exposures stacked manually. Photo: Tamás Csizmadia, Smartphone Astrophotographer of the Year.
FAQ
Which iPhones support Night Mode? iPhone 11 and later. That includes the 11, 11 Pro, 12 series, 13 series, 14 series, 15 series, 16 series, and SE (2nd generation onwards).
What is the maximum Night Mode exposure time on iPhone? 10 seconds by default. On Pro models and newer standard iPhones, the phone unlocks 30 seconds when it detects it is on a stable tripod in very dark conditions. You have to drag the Night Mode slider to MAX manually after it appears.
Is Apple ProRAW worth enabling for astrophotography? Yes. A ProRAW file gives you substantially more editing headroom than a JPEG, particularly for shadow recovery and white balance. Enable it before you go out, and remember to switch back to JPEG for casual photography.
Do I need a separate app to shoot the Milky Way on iPhone? Not necessarily. Night Mode in the built-in Camera app is genuinely capable. You only need a third-party app like Halide or ProCam if you want full manual control over ISO and shutter speed independently.
Can I shoot the Milky Way on an older iPhone? With a third-party app and a tripod, yes. Without Night Mode you are working against the phone’s default automation, but manual mode in Halide or ProCam gives you the same 30-second exposure regardless of model.
Next steps
- How to photograph the Milky Way with a phone — the full pillar guide covering all smartphones
- iPhone astrophotography — the broader guide to iPhone astrophotography beyond the Milky Way
- Best phones for astrophotography — how iPhone compares to Pixel, Samsung, and others
- Best astrophotography apps — Halide, ProCam, Lightroom Mobile, and more
