You can shoot the Milky Way with the phone already in your pocket.
You do not need a $3,000 camera, a star tracker, or any prior experience. The best time to try is during Milky Way season, and your phone can do far more than you think.
That is the whole promise of how to photograph the milky way with your phone: a modern phone at a dark site can capture the bright core of our galaxy.
iPhones do it with Night Mode, Google Pixels have a dedicated Astrophotography Mode, and Samsung Galaxy phones use Expert RAW.
I am a beginner at smartphone astrophotography myself, so this guide is built on what actually works, tested and stripped down for newcomers, plus the techniques of the winners of the Smartphone Astrophotographer of the Year competition we run.
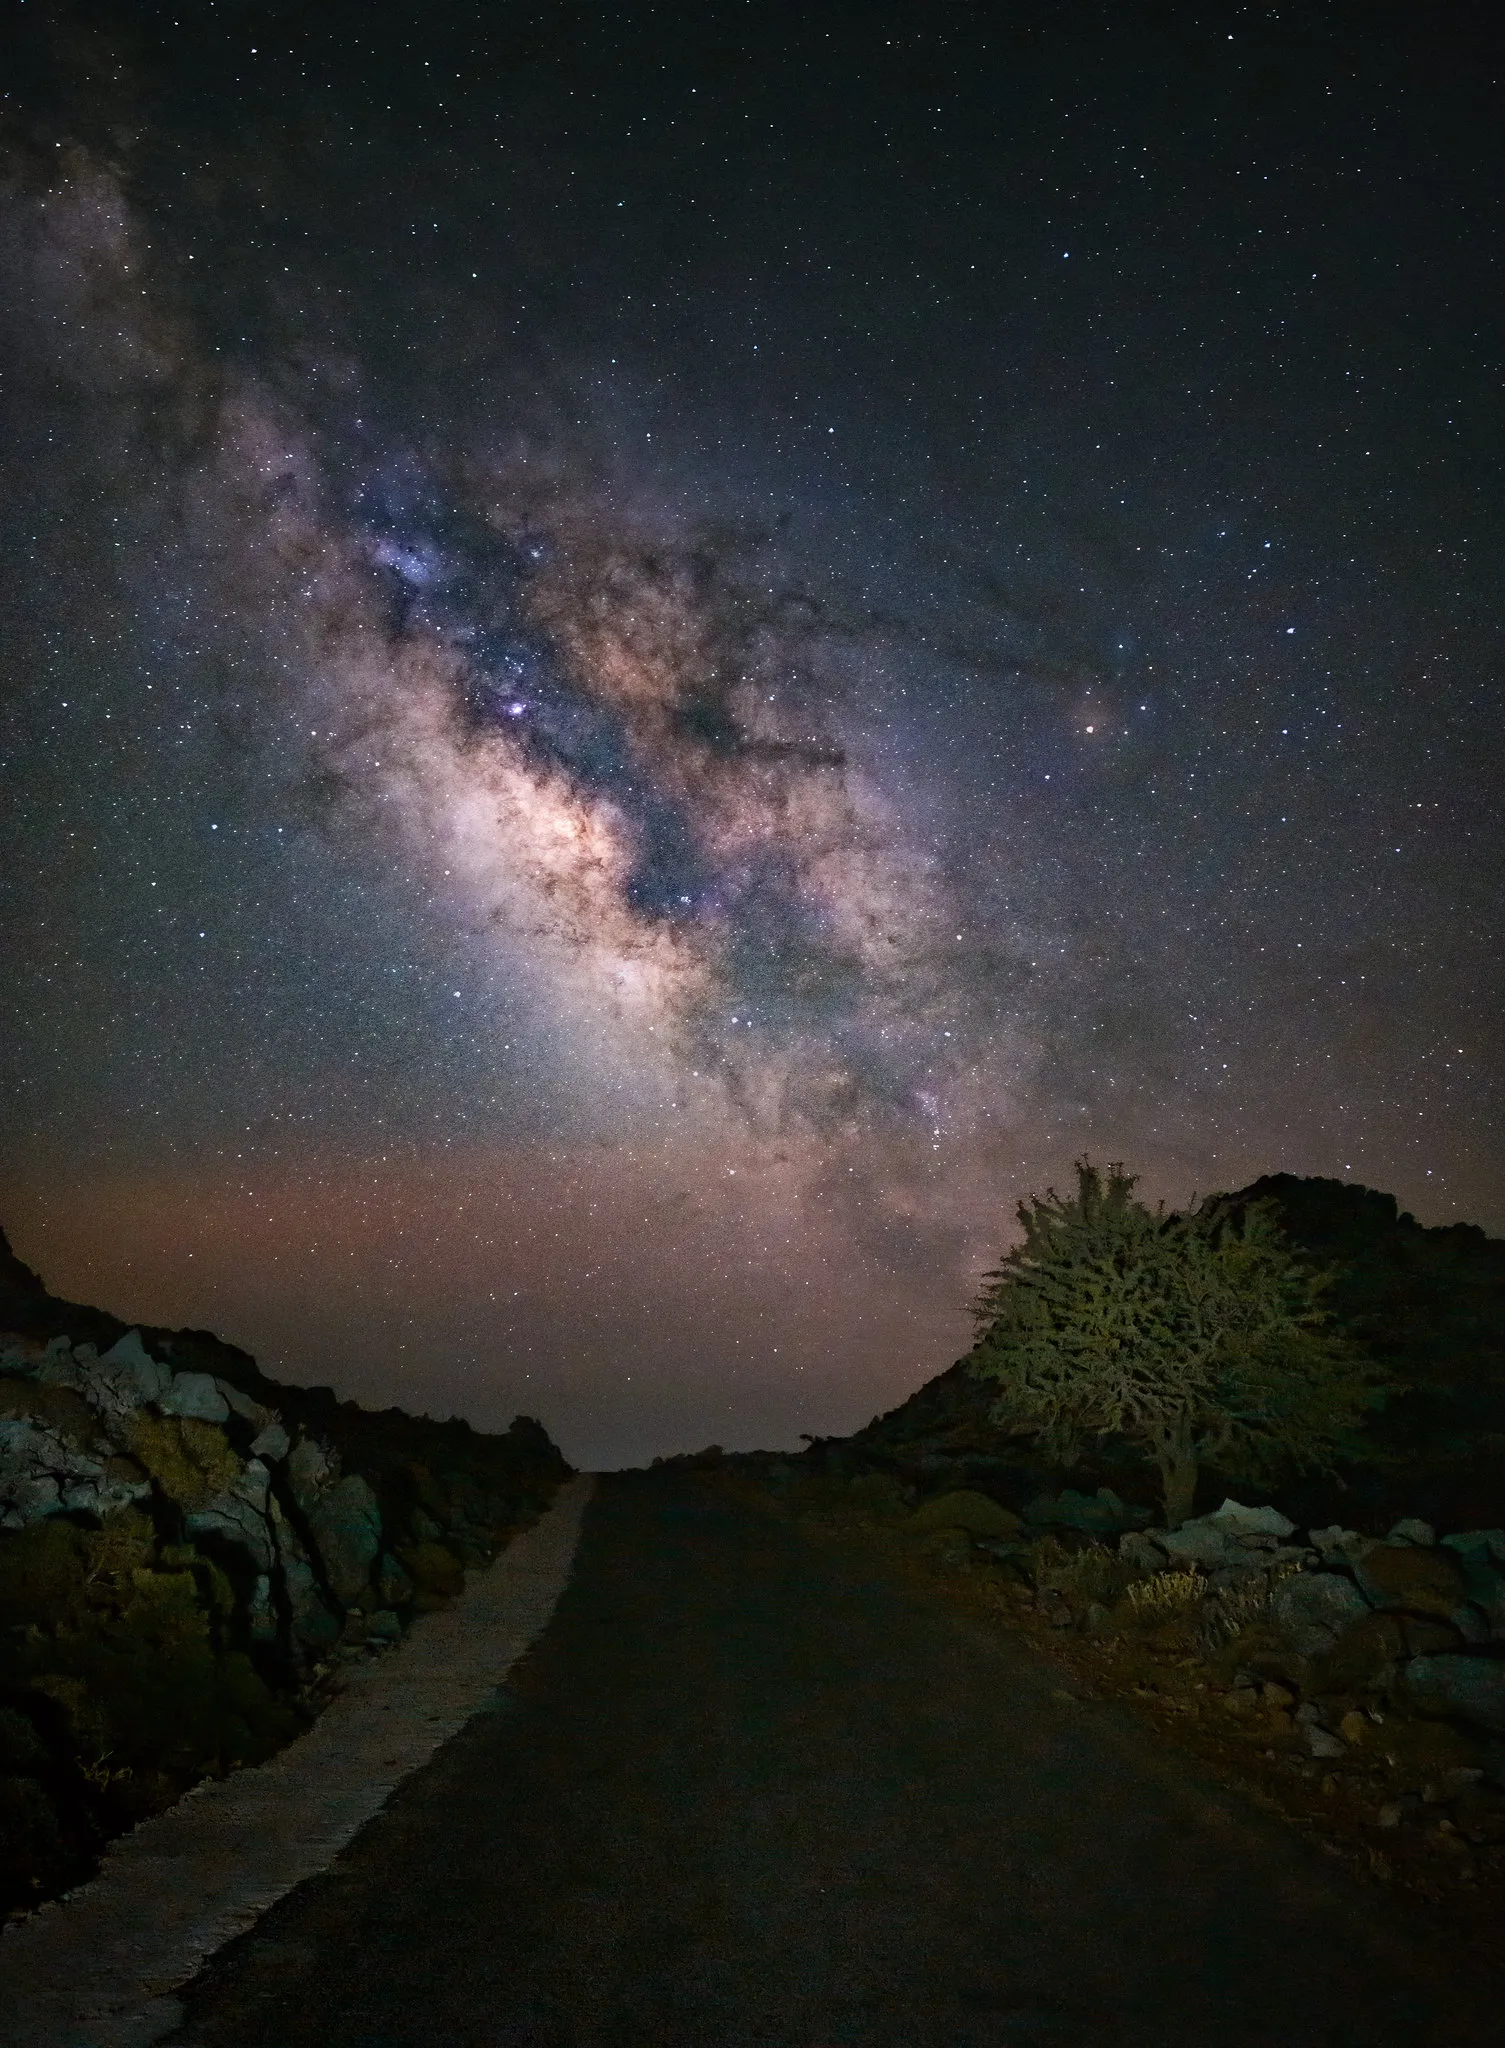
 Shot on an iPhone 16 Pro in Night Mode, 30 seconds. Photo: Alvaro Ocaña, Smartphone Astrophotographer of the Year.
One honest caveat up front. A phone shot will not match a DSLR for fine star detail, and you cannot capture deep-sky nebulae with it.
No matter. You will still come home with a real, shareable Milky Way photo, and knowledge and planning will matter far more than your handset.
Key takeaways:
- Find a dark sky first. It matters more than your phone or your tripod.
- A tripod is strongly recommended, but propping your phone on something steady works in a pinch.
- Use your phone’s built-in astro or night mode first. Go manual only when you want full control.
- Shoot RAW so you have room to edit.
- Edit lightly. A few sliders do most of the work.
If you are still choosing a handset, see the best phones for astrophotography.
Step 1: Know When and Where to Shoot (Season, Dark Sky, and Finding the Core)
Most failed Milky Way shots fail before the phone ever comes out.
Get four things right and your phone will do the rest: a dark location, a night near the new moon, the right time of year, and clear skies. Miss one and the others will not save you.
That said, do not wait for perfect conditions to start practising. A clear night in the back garden is a great way to learn the settings.
Season. In the Northern Hemisphere (Europe, the US, and so on) the bright core is visible from roughly March to October, peaking in June, July, and August when it sits highest and brightest.
In the Southern Hemisphere it runs a little longer, February to October, peaking April to August.
You can shoot the fainter “winter Milky Way” outside these months, but you will need darker skies to do it.
Dark sky. Open the free lightpollutionmap.info and aim for a Bortle 4 zone or darker.
Bortle is just a 1 to 9 scale for how dark a sky is, where 1 is remote wilderness and 9 is a city centre. On the map, the blue, grey, and black zones are what you want.
Your backyard is probably too bright, but a 20 to 30 minute drive often gets you somewhere far darker.
The moon. The moon matters as much as the location, because a bright moon washes the stars out.
Shoot on or within about four days of a new moon, which gives you a roughly nine-day window each month.
A quick search gives you the new-moon dates, or use the free Clear Outside app (iOS and Android), which shows the moon phase, darkness window, and cloud cover in one place.
Find the core. Use a free planetarium app like Stellarium (or Sky Guide on iPhone) to see where the core will sit on your chosen night and which way to face.
In summer in the Northern Hemisphere, look south to south-east. More astrophotography apps cover planning in depth.
![]() Proof an old phone is enough: shot on a Google Pixel 4a in Astrophotography mode. Photo: Sandra Regan, Smartphone Astrophotographer of the Year.
Proof an old phone is enough: shot on a Google Pixel 4a in Astrophotography mode. Photo: Sandra Regan, Smartphone Astrophotographer of the Year.
Milestone: a clear, near-new-moon night at a Bortle 4 or darker spot, with the core above the horizon.
Before you head out, grab our free smartphone Milky Way cheat sheet so the whole checklist sits in your pocket.
Step 2: The Only Gear That Actually Matters (No DSLR Required)
The entire required kit is the phone you already own plus a way to hold it still.
That is the quick win here. I have shot the stars with nothing more than a phone and a cheap tripod. No DSLR, no $3,000 camera.
Because we are taking long exposures of faint light, the phone has to stay perfectly still. You cannot do it handheld.
A tripod is the easy answer and it is strongly recommended, especially when you have planned a special shoot. But it is not the only answer.
I once balanced my phone on a tub of ice cream on my car bonnet because the sky had suddenly cleared, and it worked fine. Anything steady that points the phone the right way will do in a pinch.
There is one more reason a stable base matters: the best phone modes refuse to start without it.
Pixel Astrophotography Mode and Samsung’s Astrophoto feature only activate when the phone senses it is dead still. So holding it by hand does not just blur the shot, it locks you out of the mode entirely.
Here is the full kit:
- A tripod plus a phone clamp, or a sturdy improvised support. A small mini-tripod or a flexible GorillaPod with a phone mount is ideal. Avoid tall, single-pole “selfie” tripods, which are wobbly and often cannot point straight up.
- A way to fire the shutter without touching the phone. The built-in timer (set it to 5 seconds) is enough. A cheap Bluetooth remote is a nice-to-have, not a need.
- Optional, for venturing out: a power bank (a dead phone ends the night, and it is a safety issue too) and a red head torch (it lets you see without ruining your night vision).
What you do not need: a DSLR, a star tracker, or an expensive lens. None of it.
If you are weighing an upgrade with astro in mind, the best phones for astrophotography breaks down what each model can actually do.
Milestone: phone held steady and pointed at the sky, with a no-touch shutter method chosen.
Step 3: Use Your Phone’s Best Night Mode: iPhone, Pixel, and Samsung
The best Milky Way tool you own is probably already built into your camera app, and most people never find it.
Stick with the native camera app, whatever your phone. There is no need to download anything else, and most of the winning competition photos were taken on the stock app.
Jump to your phone below and follow the taps.

iPhone (Night Mode and ProRAW)
Night Mode is automatic on the iPhone 11 and later, and it works well on the night sky.
You cannot switch it on in a bright room, the phone has to detect low light first.
- Turn on Apple ProRAW before you leave home: Settings > Camera > Formats > Apple ProRAW. In the Camera app, tap the RAW icon to use it. ProRAW keeps the full sensor data for editing.
- On your tripod, open Camera. When it is dark enough, the Night Mode icon shows a number, for example 5 seconds.
- Tap it to raise the exposure to 10 seconds. On a tripod under dark skies, the phone senses the stillness and lets you push it to a full 30 seconds. That 30-second exposure is the one you want.
- Fire with the 3 or 10 second timer so nothing shakes.
Honest caveat: in the native app the ISO is automatic and not adjustable. For full manual control of ISO and shutter you need a third-party app, which I cover in Step 4.

 iPhone 16 Pro Max, Night Mode, 30 seconds. Photo: Zahari Dimitrov, Smartphone Astrophotographer of the Year.
Google Pixel (Astrophotography Mode)
This is arguably the single best built-in Milky Way tool on any phone, and the one most guides ignore.
It takes a series of long exposures over about four minutes, then stacks and processes them into one clean image.
Stacking works because the random noise cancels out across frames while the real starlight stays put, and Google’s AI separates the foreground from the sky before aligning.
It runs on the Pixel 3 and newer, and is best from the Pixel 7 on.
- On a tripod, open the Google Camera app and tap Night Sight.
- Hold steady. When the phone senses it is still and pointed at a dark sky, the shutter icon changes from a moon to stars. That stars icon means you are in Astro mode.
- If it does not appear, check Night Sight > settings cog > Astrophotography is set to Auto. You cannot force it on, only allow it to switch on automatically.
- Tap the shutter, let the timer count down, and wait about four minutes without touching the phone.
A handy trick to practise indoors: lay the phone face-down on a table so it sees darkness, and it will offer Astro mode so you can rehearse the steps before you go out.
![]() Google Pixel 8, Astrophotography mode, one tap. Photo: Martin Timko, Smartphone Astrophotographer of the Year.
Google Pixel 8, Astrophotography mode, one tap. Photo: Martin Timko, Smartphone Astrophotographer of the Year.
Samsung Galaxy (Expert RAW Astrophoto)
Samsung’s Astrophoto mode also stacks multiple frames, but it lives inside a separate free app rather than the standard mode list.
- Download the free Expert RAW app from the Galaxy Store.
- Open the Camera app, tap More, and select Expert RAW.
- On a tripod, tap the constellation icon at the top right to enter Astrophoto.
- Choose your capture length: short (3 minutes), medium (6 minutes), or long (12 minutes). The longer it runs, the better the result.
- Press the shutter and leave the phone alone until it finishes. It saves a RAW .dng file in your Gallery.
Astrophoto works on the Galaxy S20 and later, and is best from the S22 Ultra on.
 Samsung Galaxy S24 Ultra, Astrophoto mode, 3-minute capture. Photo: Ivan Ferrero, Smartphone Astrophotographer of the Year.
If you want your exact phone model walked through step by step, our Smartphone Milky Way Blueprint course does exactly that.
Step 4: Go Manual for Full Control (Settings That Work on Any Phone)
The astro and night modes should always be your first option.
But if you want full control, or your phone has no astro mode, manual is where you set the exposure and ISO yourself.
It is also how the overall Smartphone Astrophotographer of the Year was won: a single 30-second exposure at ISO 2000, shot in Pro mode on a Xiaomi.
How you get to manual depends on the phone:
- Google Pixel: open the camera settings and adjust manually.
- Samsung Galaxy: open the Camera app, tap More, and select Pro.
- iPhone: the native app has no manual ISO or shutter, so download a third-party app like Halide or ProCam.
A good starting point on any phone (then experiment, there is no single perfect recipe):
- Shutter speed: 30 seconds. If the stars come out as short streaks, shorten it.
- ISO: 1600. Raise it if the core is too faint, but high ISO adds grainy noise, so do not overdo it.
- White balance: 3500K to 4000K, not auto. You can fine-tune it later in editing.
- RAW on, and leave the resolution at the default (around 12MP), which is cleaner for astro than the maximum.
A quick word on star trails. The wider the sky you capture in one frame, the longer you can expose before stars start to streak from the Earth’s rotation.
Thirty seconds is a fine starting point on a phone’s wide lens. If you see trailing at the edges, drop to about 15 to 20 seconds.
For the technically minded, the NPF rule calculator gives a precise maximum for your setup.
Worth knowing: RAW is not just for manual. Turn it on in the astro and night modes too, so you keep the full data to edit later.
 Xiaomi 14 Ultra, Pro mode, single 30-second exposure at ISO 2000. Photo: Mihail Minkov, overall Smartphone Astrophotographer of the Year.
Milestone: shutter, ISO, white balance, and RAW dialled in, ready to focus.
Step 5: Nail Focus in the Dark
Autofocus struggles in the dark. It hunts and locks onto nothing, which is why so many first attempts come back as soft blobs.
The good news: the automatic astro and night modes handle focus for you, so this mainly matters when you shoot manually.
In a manual app:
- Set focus to the infinity mark as a starting point. It is rarely exact, so treat it as a rough position.
- Find the brightest star in the live view and magnify the preview as far as it will go.
- Adjust until that star is the smallest, sharpest point you can make it.
Whatever mode you use, fire a quick test shot first and pinch to zoom in on the stars before committing to a full exposure or a four-minute stack.
If the stars are crisp points, you are good.
Milestone: a test frame with pinpoint stars.
Step 6: Compose the Shot With a Foreground
A strong foreground is the fastest way to make a phone Milky Way shot look intentional instead of a grey field of dots.
A picture of bare sky is, honestly, a bit boring. The landscape is what gives it scale.
Start with the main (1x) camera. It has the best sensor of the bunch, so resist the urge to switch to the ultrawide for a bigger view or to zoom in, as both give a worse result.
Begin with the main lens every time.
Then lean on a few simple rules:
- Rule of thirds. Turn on your camera’s 3x3 grid and put the horizon on the lower line, so the frame is about one third land and two thirds sky. Flip it if the foreground is the star of the show.
- Framing. Anchor the shot with something earthbound: a lone tree, a ridgeline, a building, a person, or a rock arch. Place the core where it actually sits (south to south-east in summer, from Step 1).
- Leading lines. Use a path, fence, or tree line to draw the eye towards the Milky Way.
Pixel owners get a bonus here. Because Google’s AI separates the foreground from the sky before stacking (as covered in Step 3), a Pixel handles a foreground especially cleanly.
 Leading lines in action. Google Pixel 8 Pro, manual mode, ISO 3200, f/1.7, 16 seconds (25 frames stacked). Photo: Evgeni Tcherkasski, Smartphone Astrophotographer of the Year.
Milestone: a composition with the core placed and a foreground anchor in frame.
Step 7: Edit Your Photo on Your Phone
Straight off the phone, the Milky Way usually looks faint and grey.
A few minutes of editing is what turns it into the image you imagined, and 95% of the photos entered into our competition had some editing done.
You do not need to be an expert. A handful of sliders does most of the work.
Use Lightroom Mobile or Snapseed. Both are free, both open RAW (.dng) files, and both run on iPhone and Android.
I find Lightroom Mobile gets slightly better results, but Snapseed is excellent too (open your RAW with Tools > Develop RAW). You can do everything below without paying for anything.
A simple Lightroom Mobile workflow on a RAW file:
- Tap Auto for a quick, sensible baseline.
- Tap Select Sky so you can treat the sky and foreground separately.
- Push Exposure up until the band of the Milky Way shows.
- Add Dehaze to pull the stars and the core out of the murk. It also lifts noise, so do not go too far.
- Apply Noise Reduction (Detail > Noise) to clean up the grain.
If you set white balance to auto when shooting, nudge the Temperature to around 3500K to 4000K to bring back the natural blues and purples.
Hold your finger on the image at any point to compare with the original.
What does “good” realistically look like? A clear core, some real colour, and the band plainly visible.
A DSLR will pull finer stars and fainter detail, and reach deep-sky objects a phone never will. But what you have is real and shareable, and that was the whole promise.

Milestone: an edited, shareable Milky Way photo. The full app rundown is in our astrophotography apps guide.
Step 8: Fix the Most Common Phone Milky Way Failures
If your first attempt flopped, it is almost always one of these, not your phone:
- Blurry or smeared stars. The phone moved, or you tapped the shutter by hand. Use a steady support and a 5-second timer or a remote.
- Stars are short streaks or trails. The exposure ran too long. Start at 30 seconds and shorten toward 15 to 20 seconds, or let a stacking mode (Pixel or Samsung) do the work. See Step 4.
- Soft, out-of-focus stars. Autofocus hunted. Lock focus manually on a bright star, as in Step 5.
- Orange or washed-out skyglow. Too much light pollution, or the moon is up. Move to a darker Bortle zone and shoot near new moon (Step 1).
- Grainy or noisy shots. ISO too high. Lower it, lean on a steady base or a stacking mode, then apply gentle noise reduction in editing (Steps 4 and 7).
- Cannot find the Milky Way. Wrong season, time, or direction. Use a planetarium app and check the core is above the horizon (Step 1).
When you want the whole workflow taught end to end for your exact phone, the Smartphone Milky Way Blueprint walks through every model and includes the planning checklists.
The free cheat sheet from Step 1 is worth carrying on your first few outings too.
Frequently Asked Questions
Can a phone really photograph the Milky Way?
Yes. Modern phones with computational modes (Pixel Astrophotography Mode, Samsung Expert RAW Astrophoto, iPhone Night Mode) capture the Milky Way core at a dark-sky location. The results are real, not faked. They will not match a DSLR for deep-sky detail, but the band and the core show up clearly. Knowledge and planning matter more than which phone you own.
Do I need a tripod?
A tripod is strongly recommended, but not strictly essential. You can prop your phone on a wall, rock, bag, or car instead, as long as it is steady and pointed the right way. What you cannot do is handhold it, because the long exposure needs the phone perfectly still, and the Pixel and Samsung stacking modes will not even start without detected stability.
What is the realistic difference between a phone and a DSLR Milky Way shot?
A phone gives you a clear core, some colour, and the visible band. A DSLR with a fast wide lens shows more stars, less noise, finer pinpoints, and fainter detail. Individual deep-sky objects like distant galaxies are not possible on a phone. The phone result is real and shareable, just not a deep-sky print.

Which phone is best for the Milky Way?
The Pixel gives the most automated, beginner-proof result thanks to its Astrophotography Mode. Samsung’s Expert RAW offers the longest stacked exposures, up to around 12 minutes. The iPhone is strong too, reaching 30-second Night Mode exposures on a tripod. In our 2026 competition the most-used phones were the Samsung S23 and S24 Ultra and the iPhone 15 Pro and Pro Max, though the overall winner shot on a Xiaomi. See the best phones for astrophotography for the full comparison.
Do I need a special app, or will the default camera work?
The native camera app is enough for almost everyone, and most winning competition shots used it. Pixel’s Astrophotography Mode and the iPhone’s Night Mode are built in. Samsung needs the free Expert RAW app for Astrophoto. You only need a third-party app like Halide or ProCam if you want full manual control on an iPhone.
What ISO and shutter should I start with?
Start at a 30-second shutter and ISO 1600, then experiment. Shorten the shutter to 15 to 20 seconds if the stars trail, and only raise the ISO if the core is too faint, since high ISO adds noise. Set white balance to 3500K to 4000K rather than auto. Full reasoning is in Step 4.
Do I need to shoot RAW?
It is strongly recommended. RAW keeps all the data your phone captured instead of compressing it, which gives you far more room to correct white balance and reduce noise, the two edits that matter most for the Milky Way. Both Lightroom Mobile and Snapseed open RAW (.dng) files for free. Remember to switch back to JPEG for everyday photos.
